We will ride into battle, and this shall be our steed...
 |
| You don't have to catch it, you don't have to feed it |
For as long as I can remember, I have always been an enormous, raging, Jet-head.
It could be genetic - one of my grandfathers flew F4U fighter planes in the pacific during the Second World War, and I believe one of my uncles had a career in the air force. Or it could just be regular cishet boy interests at work.
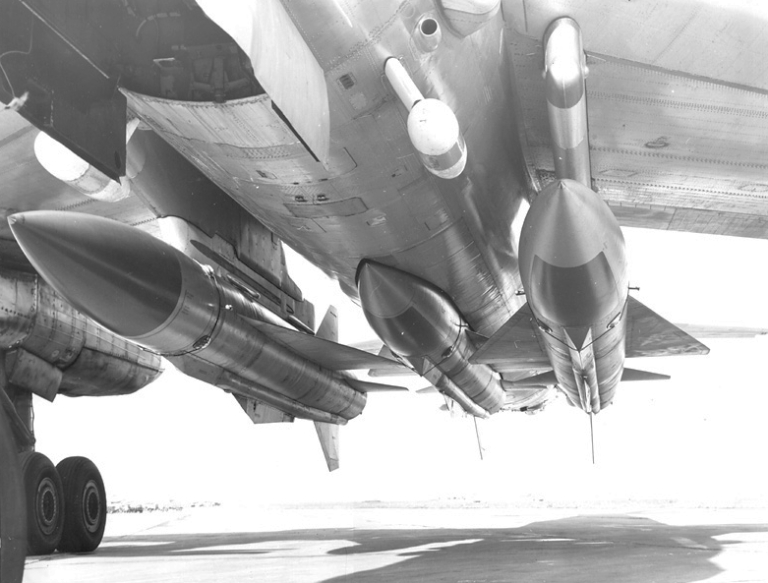
Whatever the reason may be, out of all the various forms of machinery that made my brain go Brrrr, the ones that made it Brrrr hardest by far were the aerospace vehicles. Planes, zeppelins, helicopters, spacecraft - if it moved under its own power without touching the ground, chances are I was into it. Like a lot of cishet boys I went through a very long phase of daydreaming about flying fighter jets, and a real fully functioning SU-34 fighter bomber was very high up in my Top 10 Crazy Things To Splurge On If I Ever Became A Billionaire until a couple of years ago when I remembered how vulnerable my eardrums were to rapid pressure changes. And even now that same list still has a fully functioning Krokodil assault gunship in the top 5 since helicopters don't fly high enough to implode my eardrums.
And my heart always flutters a little when hearing the distinctive Whoooooorrrrrrrrrrrraaaaaaaash of a passing fighter jet.
Naturally this also meant a key fixture of my childhood was the Supermarionation series Thunderbirds, which was all about thrilling aviation adventures and where the futuristic aerospace vehicles featured were almost more the central characters than the actual characters themselves. I was right in the middle of the 1990s Thunderbirds revival and oh boy did it leave an impression on me.
So too of course did a whole lot of other science fiction shows featuring all kinds of spectacular flying machines.
It is little wonder then, that when I ended up discovering Warhammer 40,000 I was immediately sucked into the premiere Jet-head faction of 40k bar none. Between the Hammerhead and Devilfish hover tanks, the Barracuda and Tiger Shark aircraft and the Manta Missile Destroyer, the centrepiece and crown jewel of the Tau model range has always been their awe-inspiring vehicles.
And from the moment I first saw them showcased on the GW website, I knew I had to get me as many as possible.
Because of this the history of vehicles in my 40k projects goes back a long way, but today we'll be focusing on the history of my Devilfishes specifically. And that starts with my first one, affectionately known today as 'Old Ginger'.
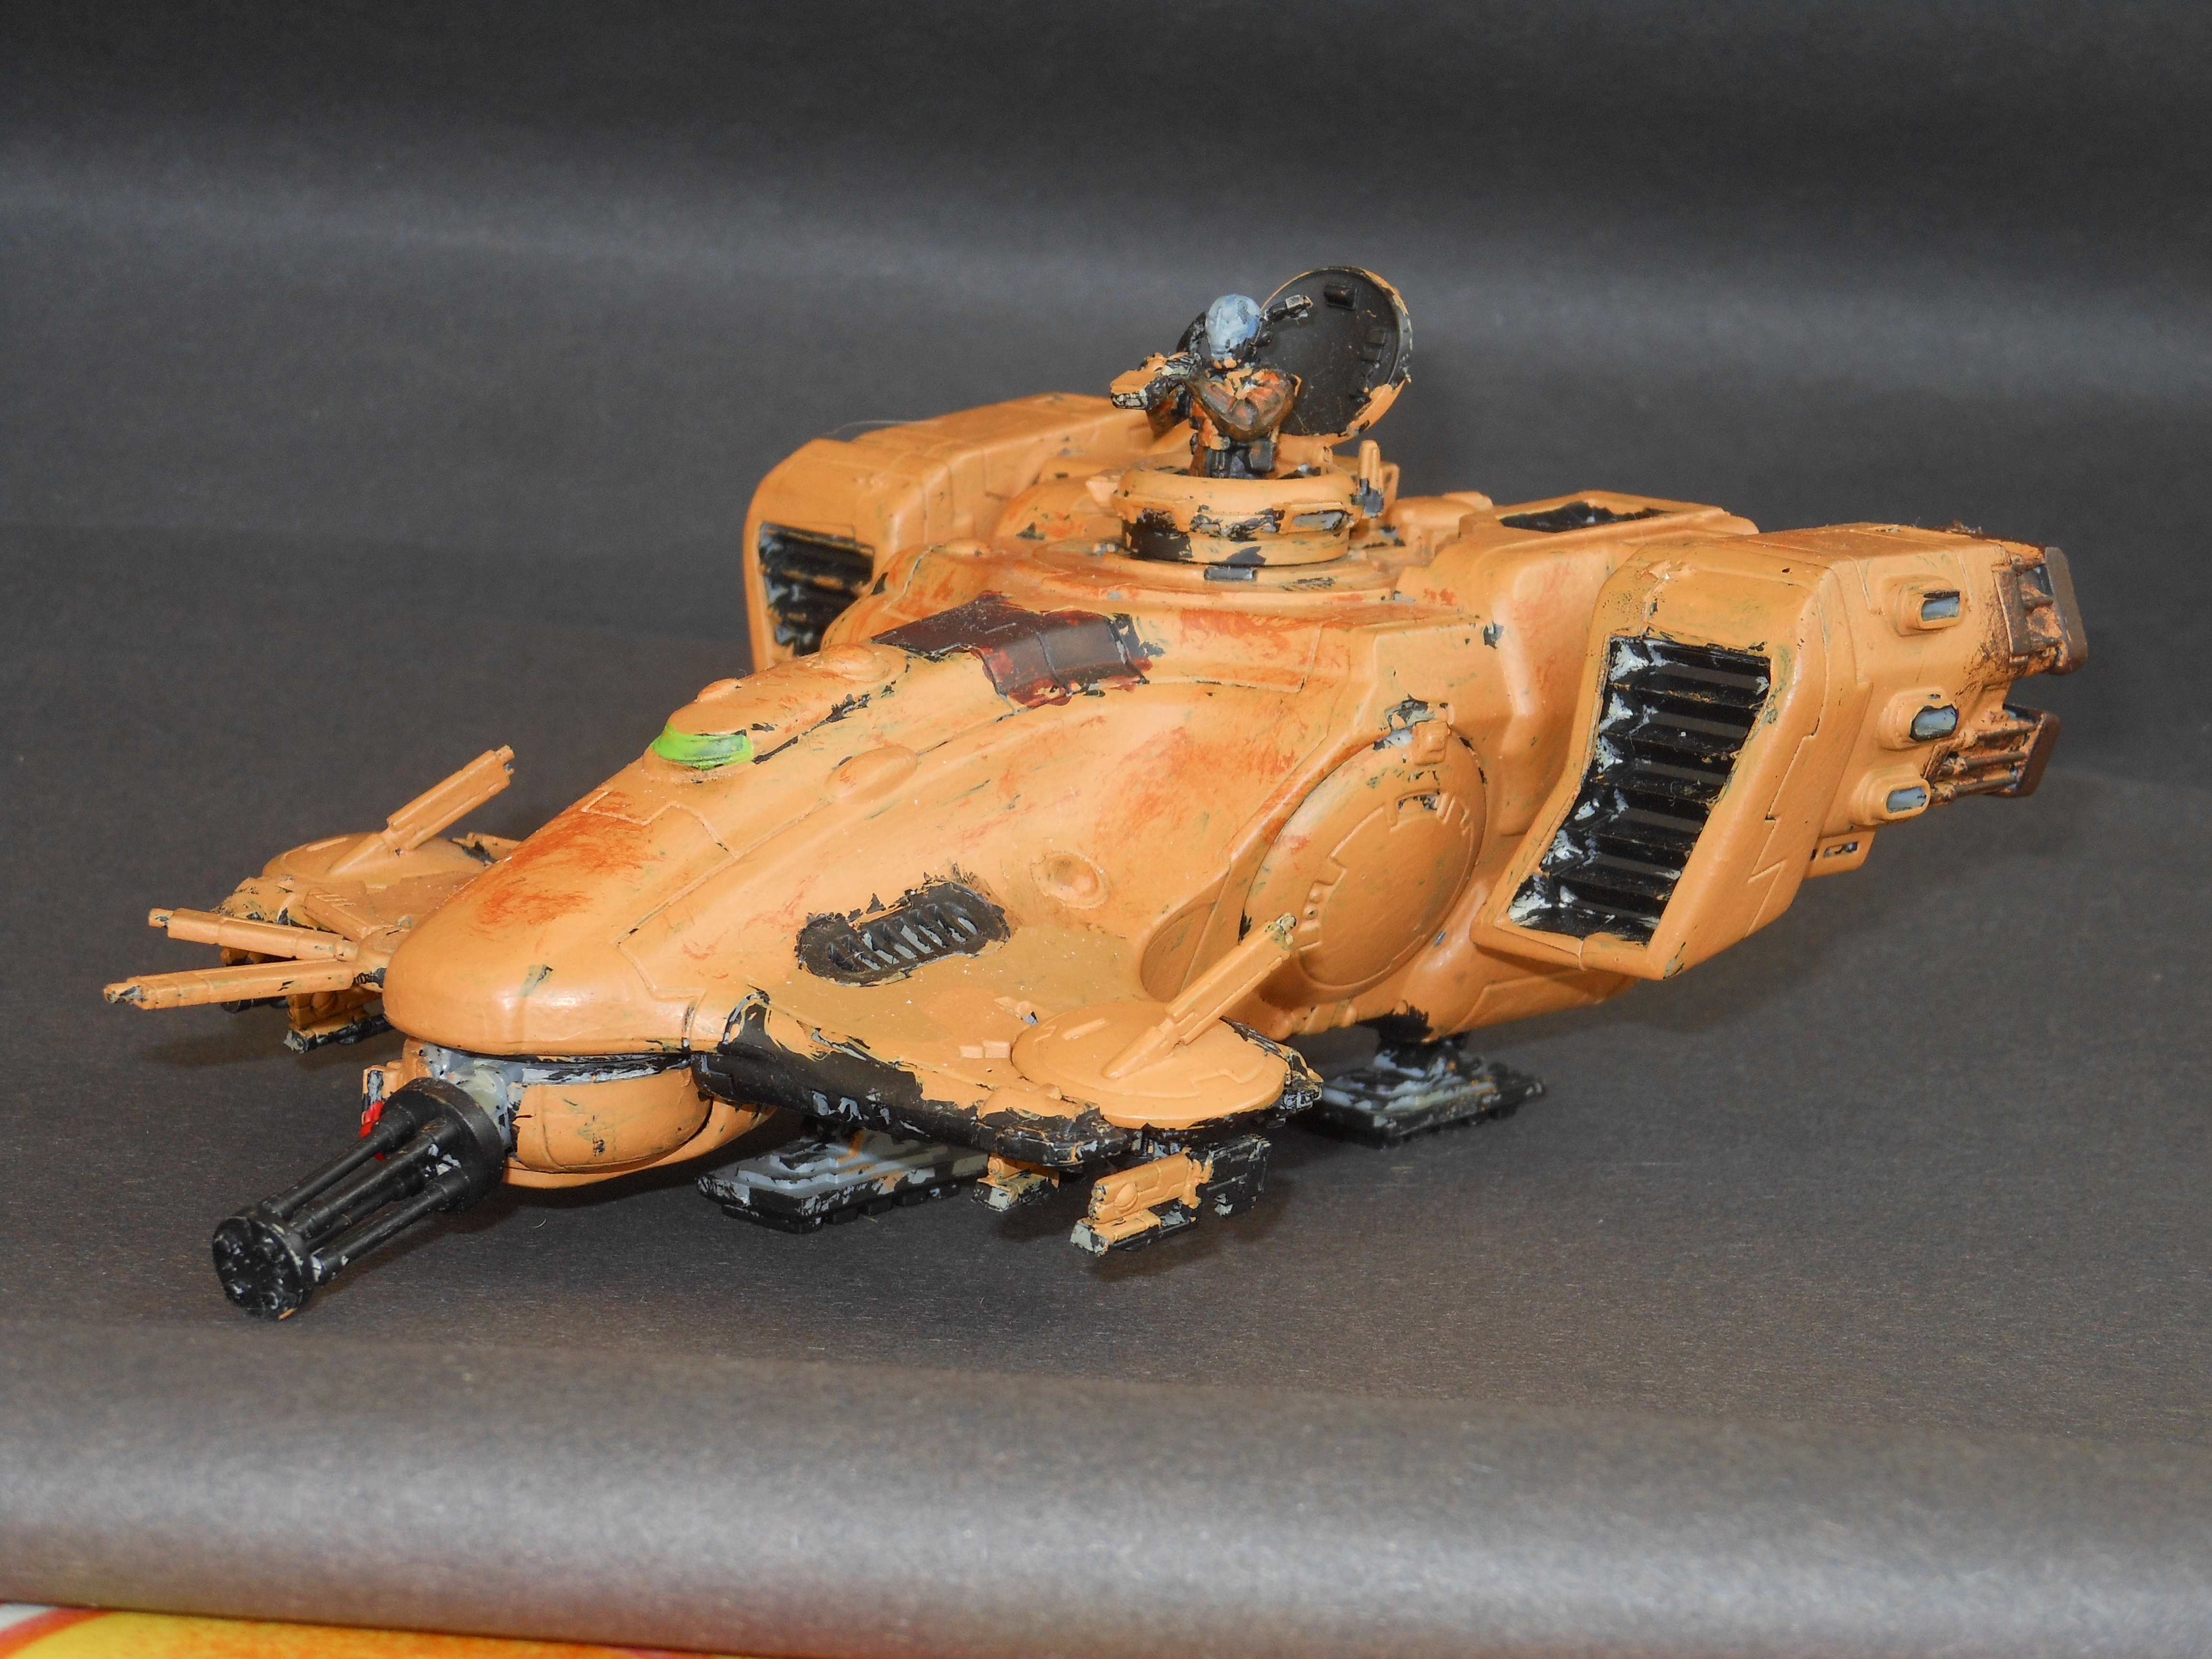
Old Ginger was actually the second 40k vehicle I ever got - we'll get to the first one later. I no longer remember exactly how old I was when I got it, but historical evidence would place it as a present for either my 9th or 10th birthday, as I remember I had I Believe In A Thing Called Love by The Darkness stuck in my head that day so it can't have been earlier than 2003.
In any case, by the time I got around to painting her I had largely moved past my experimental painting stage and had settled back into a primitive facsimile of the T'au sept desert camouflage used by the GW studio army as a standard paint scheme. The major difference, as you may have spotted, being to paint the cockpit vision block green instead of red. My general vision for the scheme was 'just like the GW studio army, but with green windows on the tanks instead of red' for no other reason than that green is my favourite colour, so I wanted the red parts of the vehicles to be green instead. The panels could stay maroon, but the cockpit window had to be green, which was one of the two points of improvement I had for the GW studio scheme (the other being to ditch the bald white helmets on the team leaders). This is the ultimate origin to the green optics used on the commanders of the modernised Tau army.

Being an attempt to replicate the studio GW Tau scheme, Old Ginger was painted following the guide in Codex: Tau. Of course, being only 9 or 10 and not quite able to fully comprehend how layering and highlighting worked, the results were restricted by my own primitive painting skills, though by the standards of the time it was fairly impressive and I still have a bit of a soft spot for the old girl today.


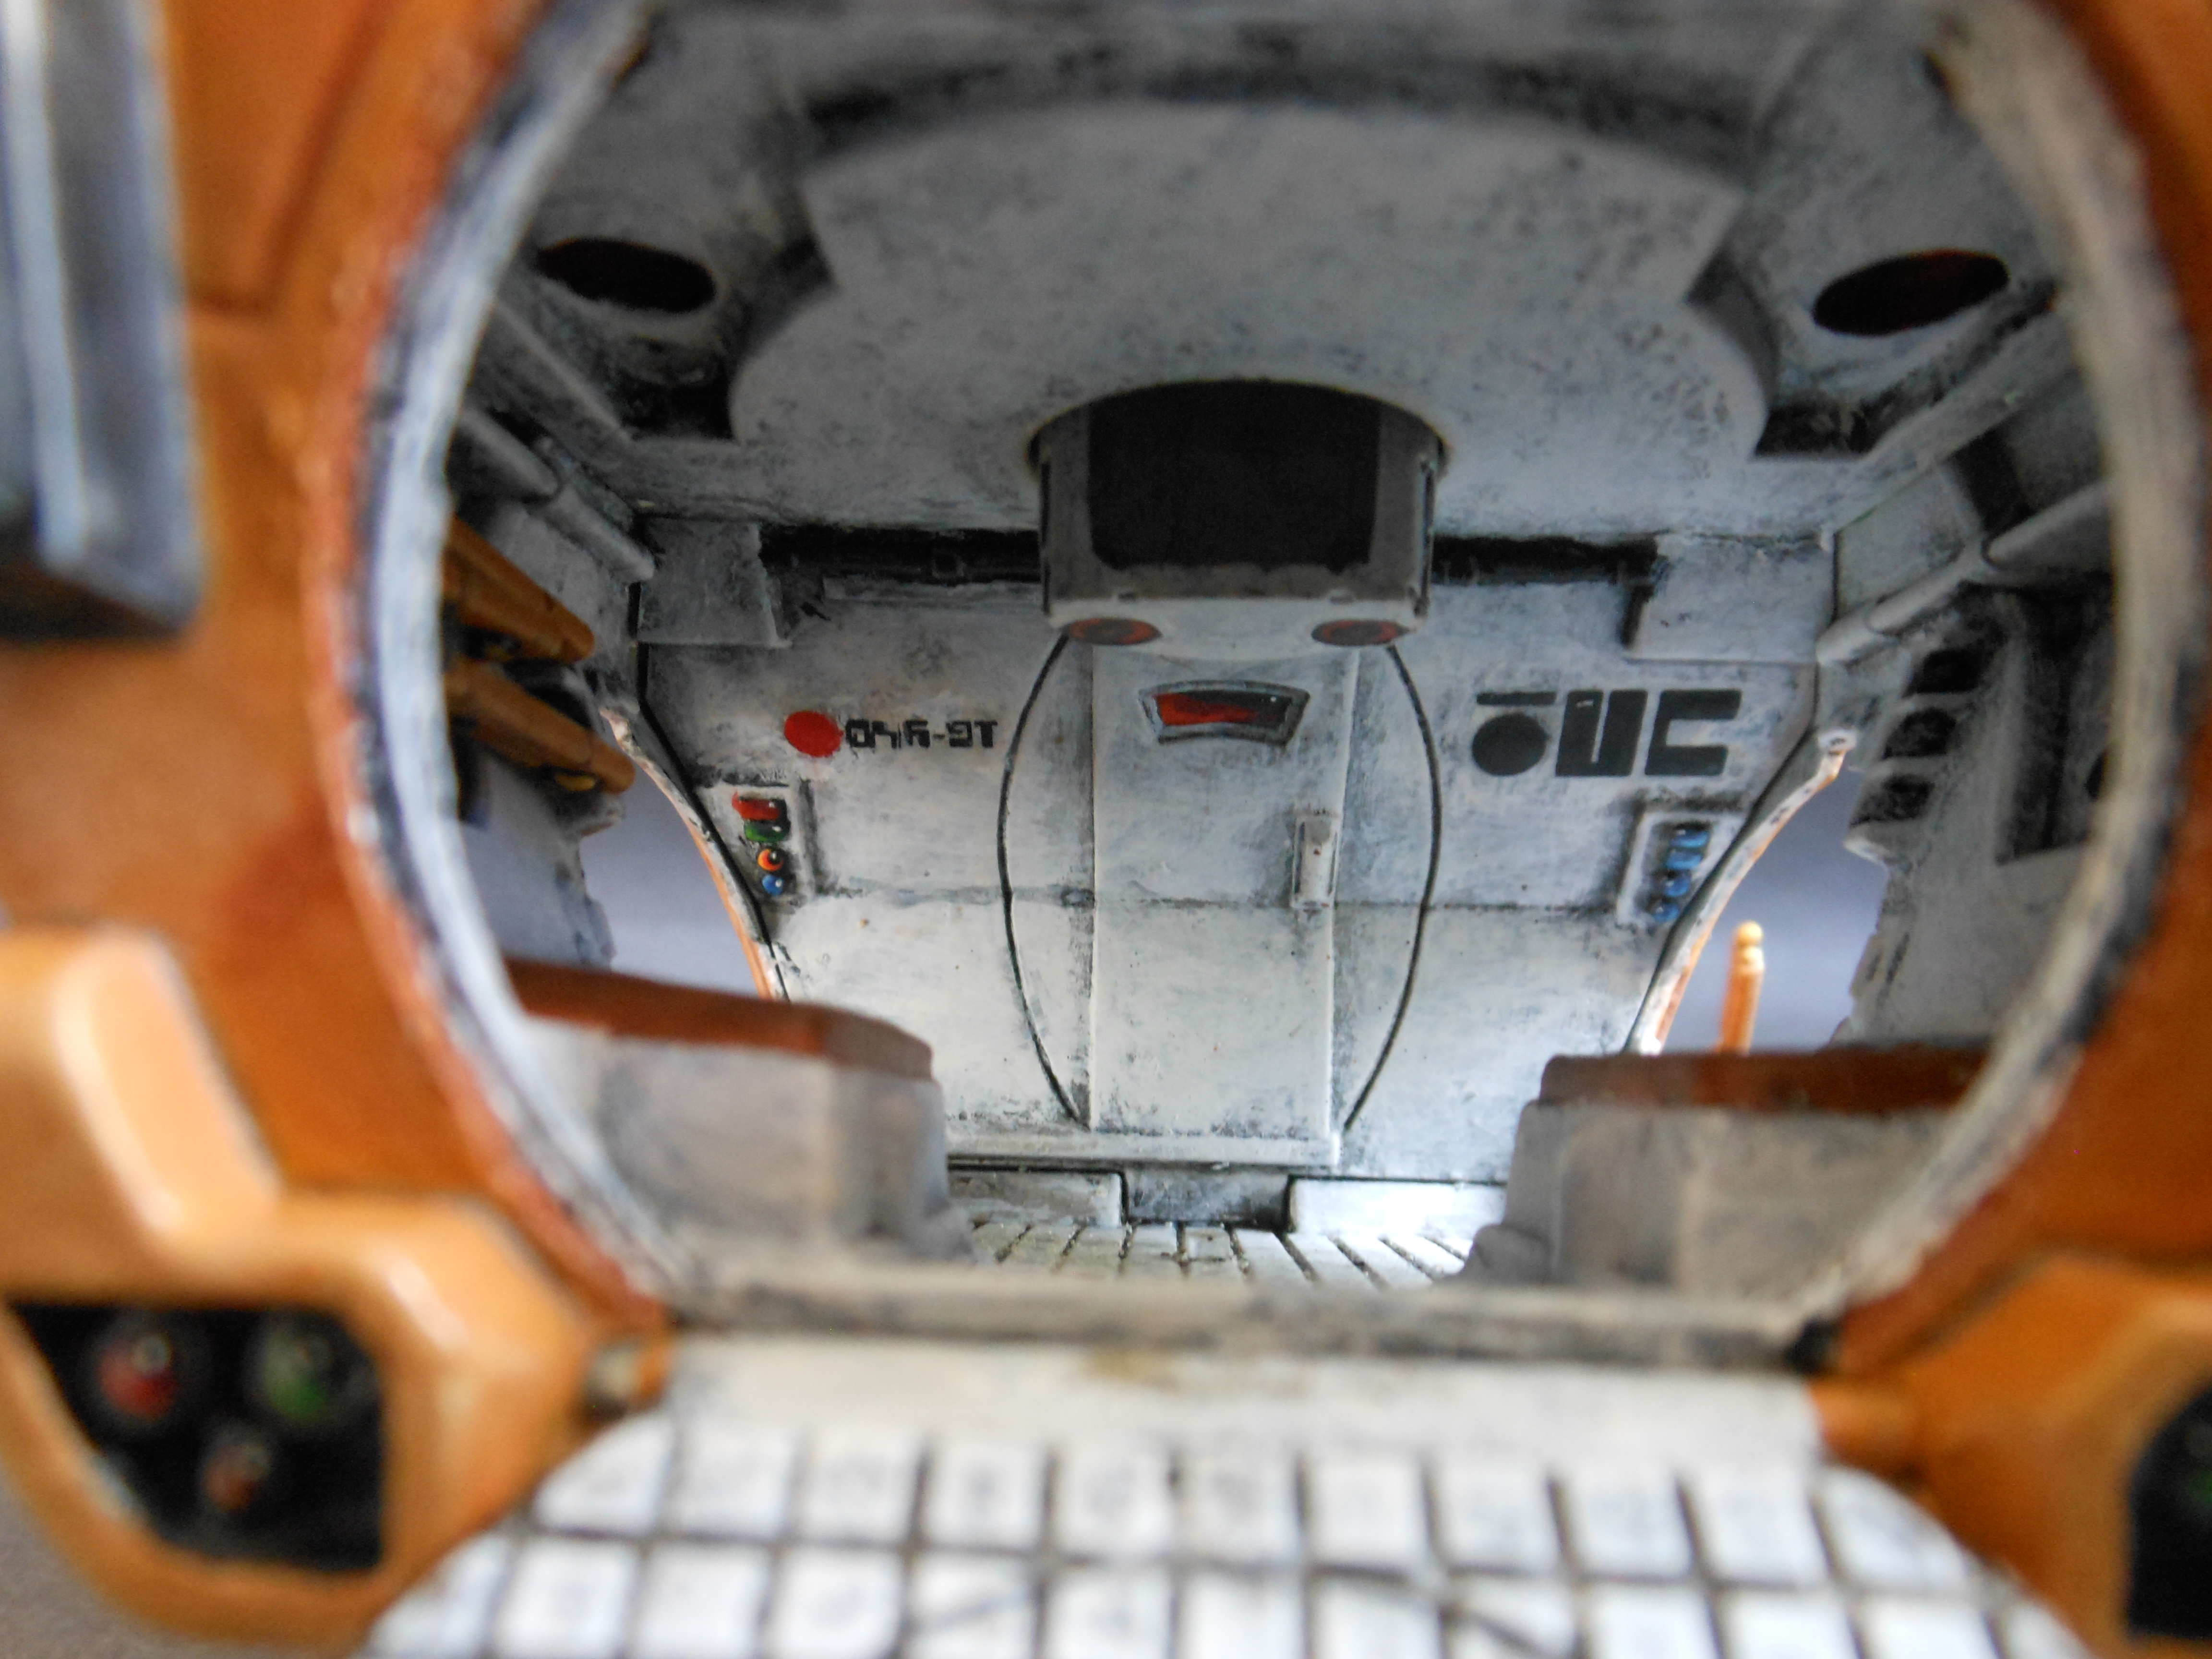
Being the first transport model I ever had, this was also my first ever vehicle with an actual interior. As with the gun drones and crisis suit that were contemporaries, I tried to keep glued parts to a minimum and left the engines, top cupola, chin turret and of course the gun drones all unglued and fully articulated. The interior was again extremely crude, just being given a black undercoat and left at that. This was because by this time I had some experience with the Devilfish that was part of the store Tau collection at the local Games Workshop (which was also painted in T'au desert camouflage but naturally to much better accuracy than my own attempts), and that one just had a plain black interior. Since I had no real points of reference or bolts of inspiration, I decided that following suite was the best way to go.


Being the only Devilfish I owned for some years meant Old Ginger was quickly assigned to transport my nascent Pathfinder team, a role in which she served faithfully for 20 years - including the only two times she ever fired her burst cannon in anger - and due to the timetable and priorities set by the defence ministry is expected to continue serving in that role well into the 2030s at least, albeit strictly in second-line roles among reservist units, popular mobilisation units and border guards.
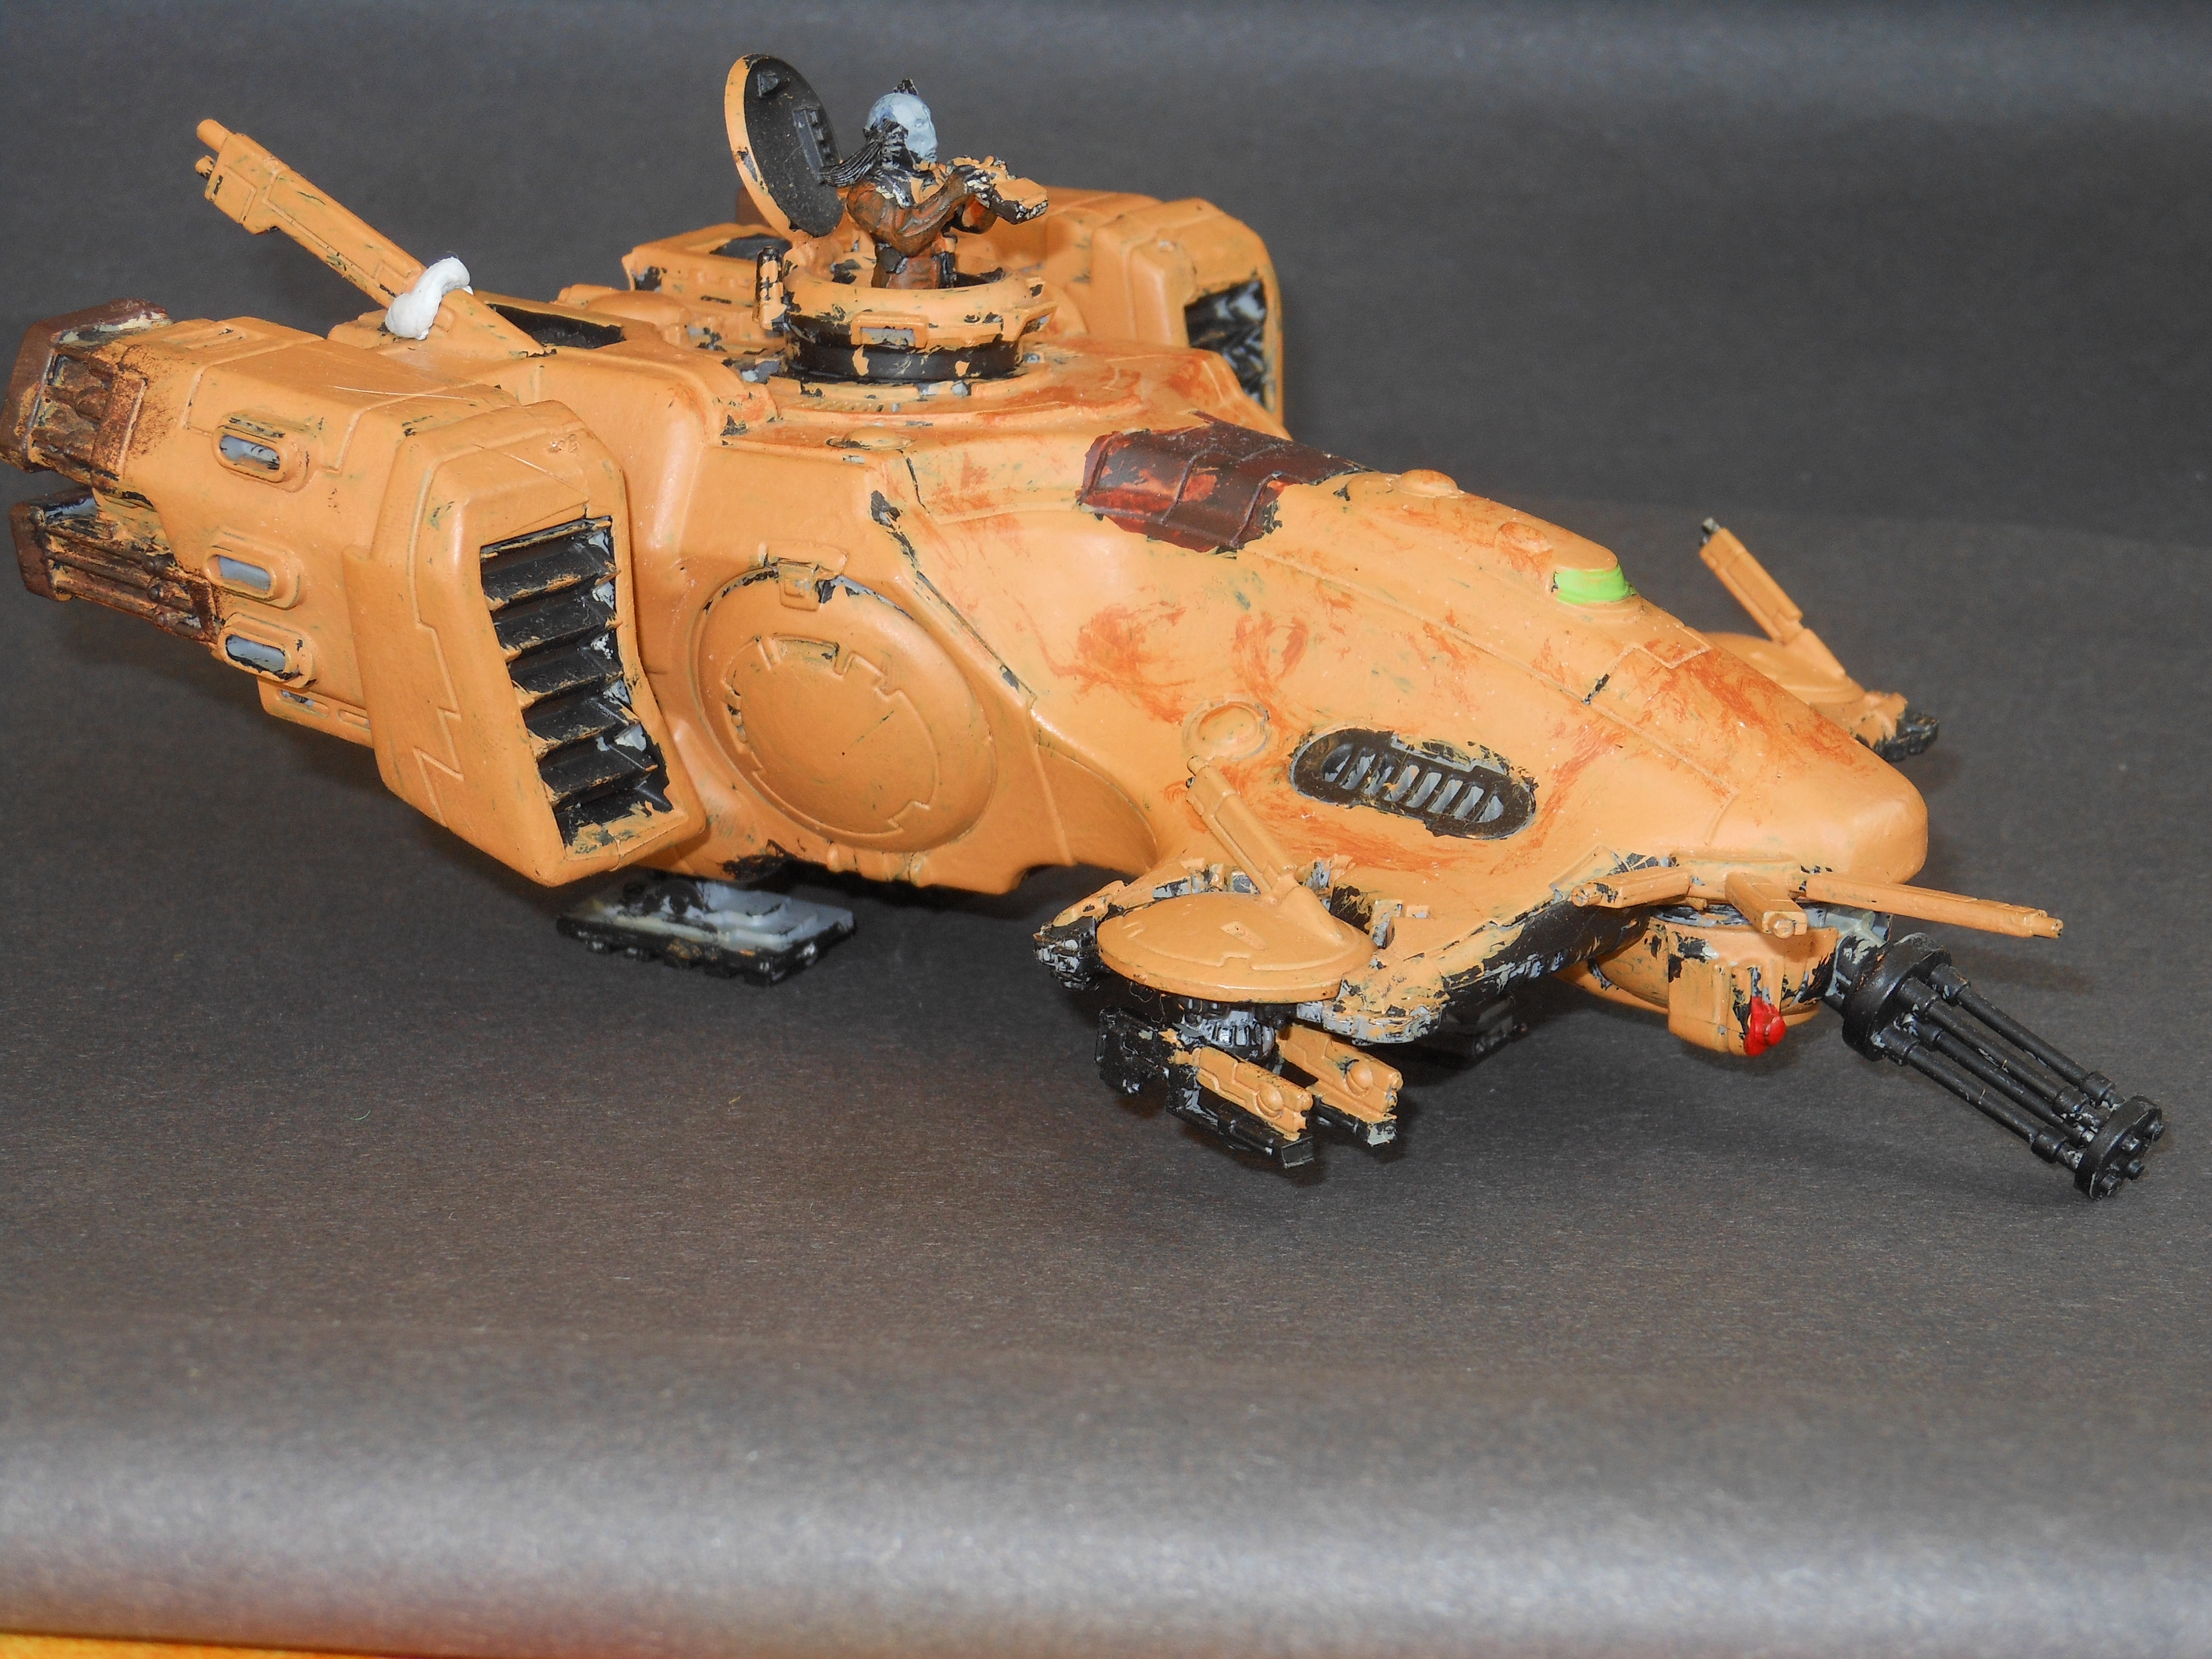
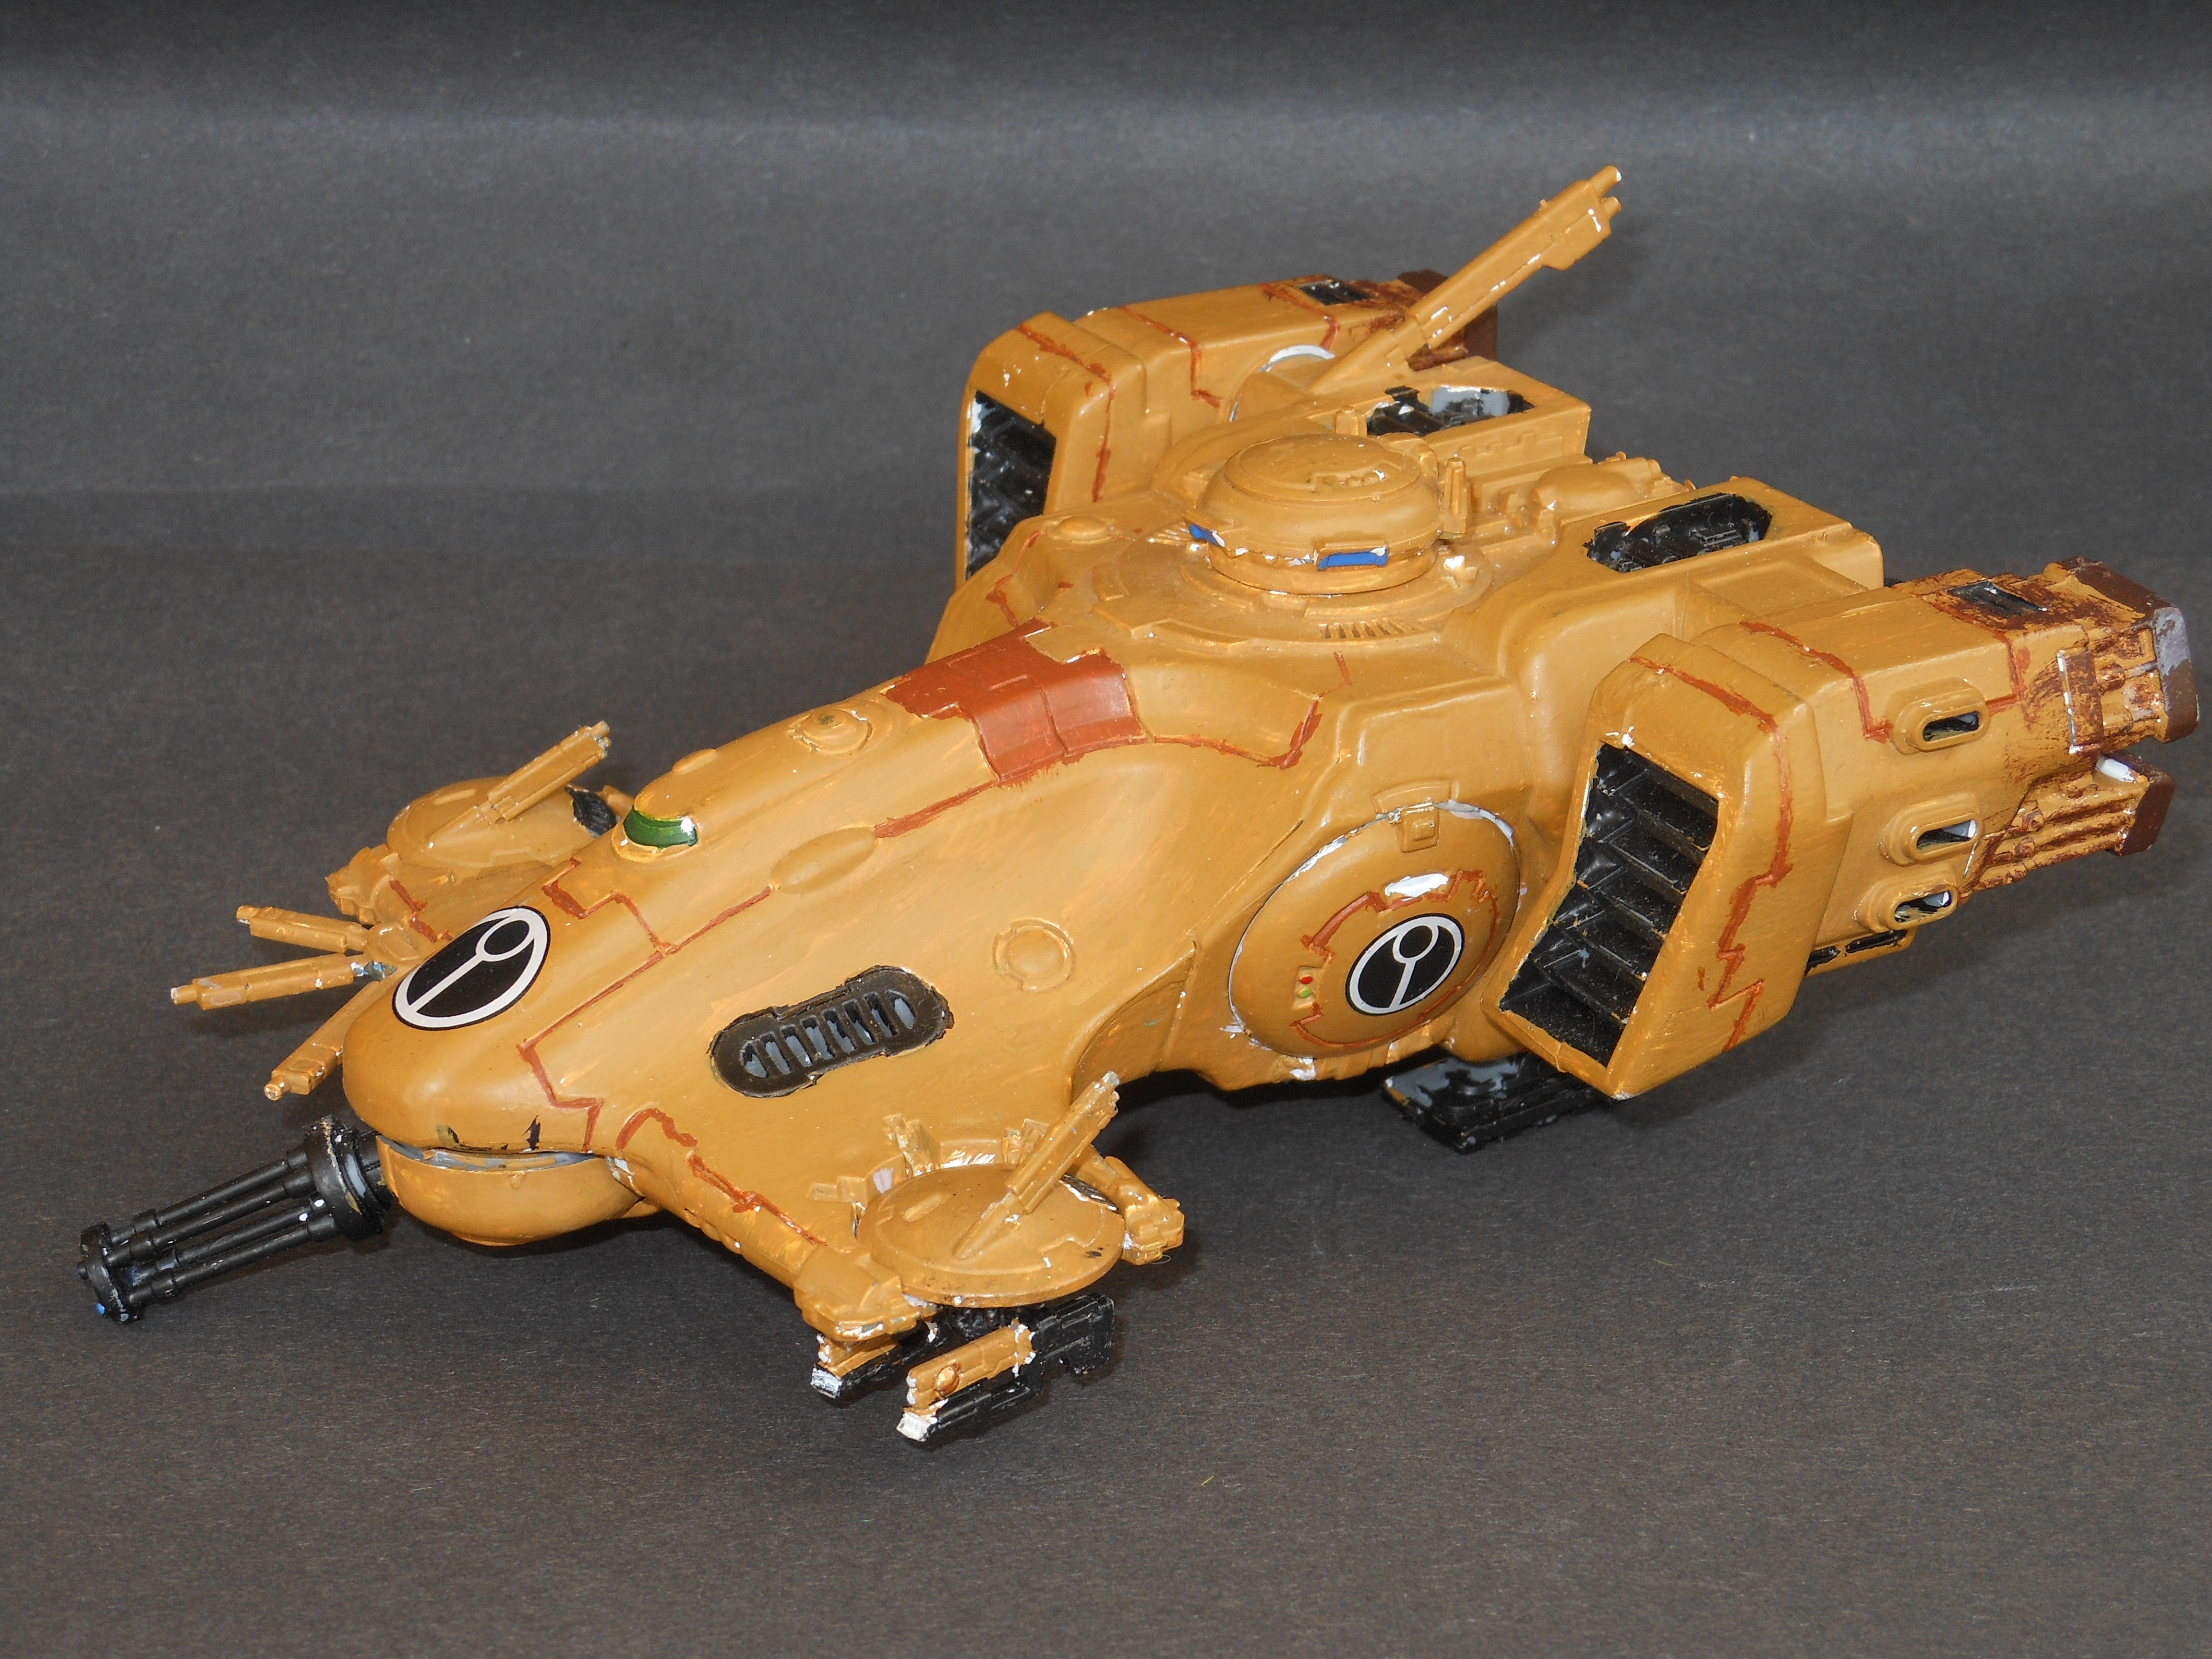
The task of transporting Fire Warrior teams was ultimately performed by my next transport, this one.
This Devilfish was painted when I was a teenager, it would have been around 2007. It belongs to the 2nd Generation of models from my first Tau army, in particular a family of vehicles that represented a massive step up in painting at the time. It may not look like much today, but back when I was around 13-14 just getting the colours in more or less the right places and having mostly distinct panel lines at all was a big achievement.
Also of note is my first serious attempts at jeweling on the cockpit vision block and the chin turret sensor. Of course at the time I still didn't quite get how layers worked in model painting, so it mostly just ended up being a flat coat of colour with a dot of white in the corner, because the white dot reflection was something that even at an early age I could recognise and fundamentally understand as a key part of the process.
The colour scheme itself also changed during this time period, because by this time I had gotten my first ever White Dwarf magazine, issue #313 (AU). This issue of course featured a major article on the legendary Tau army of Sebastian Stuart, and was a massive influence on me for many years. This Devilfish was an attempt to take some of my favourite features of Sebastian's colour scheme and mate them to the GW studio scheme so as to blend in with the rest of my models. Most notably the use of a white undercoat and Vermin Brown accent panels on the dorsal spine were both taken directly from Sebastian's colour scheme. On the other hand, the two-tone camouflage is gone here as by this stage I had given up on trying to recreate the iconic Crows' Feet pattern from the GW studio army.
Of course, Sebastian's Devilfish also featured several conversions, most notably fully articulated side doors...
.... so naturally I HAD to incorporate that improvement into my own transports!
The process was fairly straightforward in itself - all it really requires is drilling out the bottom hinge joint and sticking a pin through it to turn it from a purely decorative hinge into an actually functioning one. The biggest complication at the time was that I had none of the necessary tools for doing that, so the process was carried out by my father (who did have suitable tools) under my supervision.

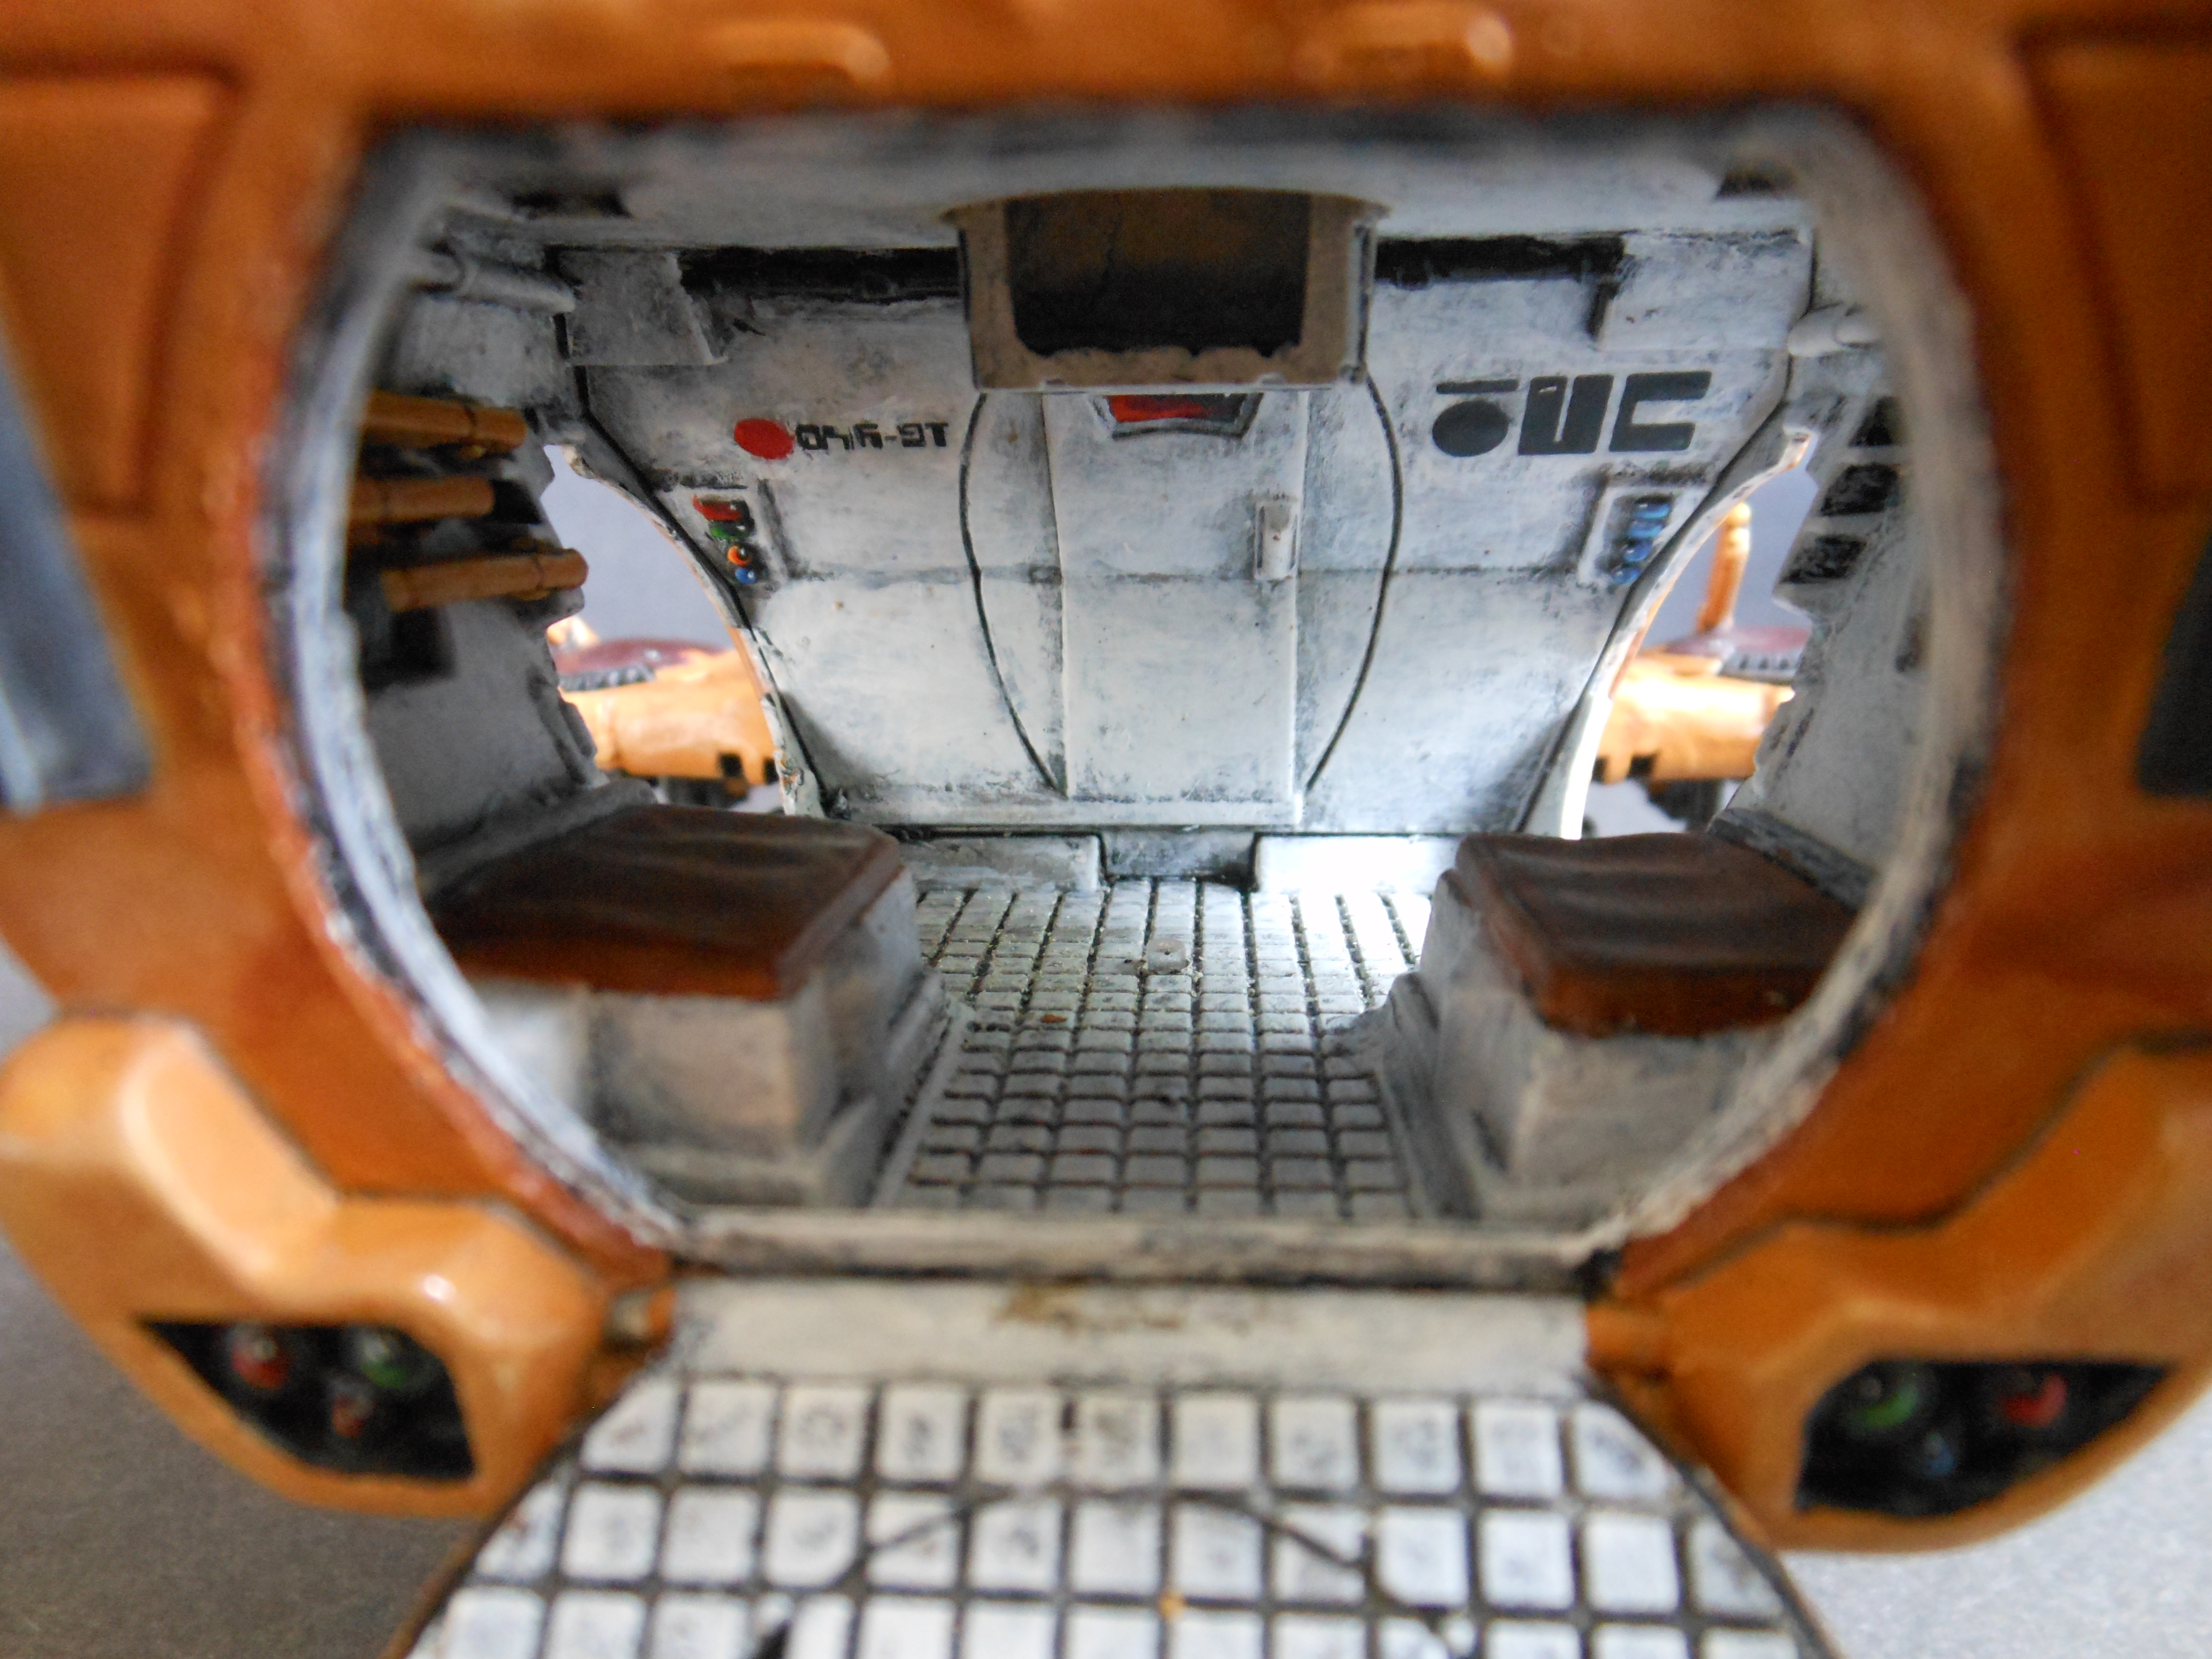
This Devilfish also featured a much more elaborately decorated interior than the first, the better to show off through the now movable side doors. Again this largely followed the lead of Sebastian's transports, with the white interior being a knock-off of his bone cream interiors and some Fire Warrior accessories in imitation of the kit he had stowed inside. There were twists however, with a spare grenade pack on one of the seats substituting for the spare helmet in Seb's because the process of creating a loose Fire Warrior helmet involved sharp cutting tools and filing that was well beyond my resources and skills at the time, and a pulse carbine stowed in the gun rack instead of Seb's stowed pulse rifle because at this stage spare pulse rifle bits were in short supply for me but I had an abundance of spare loose pulse carbines.

The seats were my own original addition, painted in the same ochre as the hull to try and introduce some colour into what would otherwise be a very monochromatic interior, and topped with Vermin Brown leather upholstery for style and comfort.
Sebastian's conversion guide called for installing magnets in the side doors to keep them secured when closed, but magnetising models was largely an unknown science to me when I was 13 - 14 or so, and there were no known magnet suppliers near me at any rate, so instead I improvised and simply used wads of blue-tack to keep the doors closed, which in hindsight did not blend into the white threshold nearly as well as I thought it did at the time.
This machine too was around for the 2-3 games of 5th edition 40k that represent the only time thus far my original Tau were ever used in direct combat, assigned to one of my Fire Warrior teams where it displayed acceptable if not spectacular performance - I no longer remember if it ever did anything truly amazing in any of the games, but it certainly wasn't a complete waste of resources either.

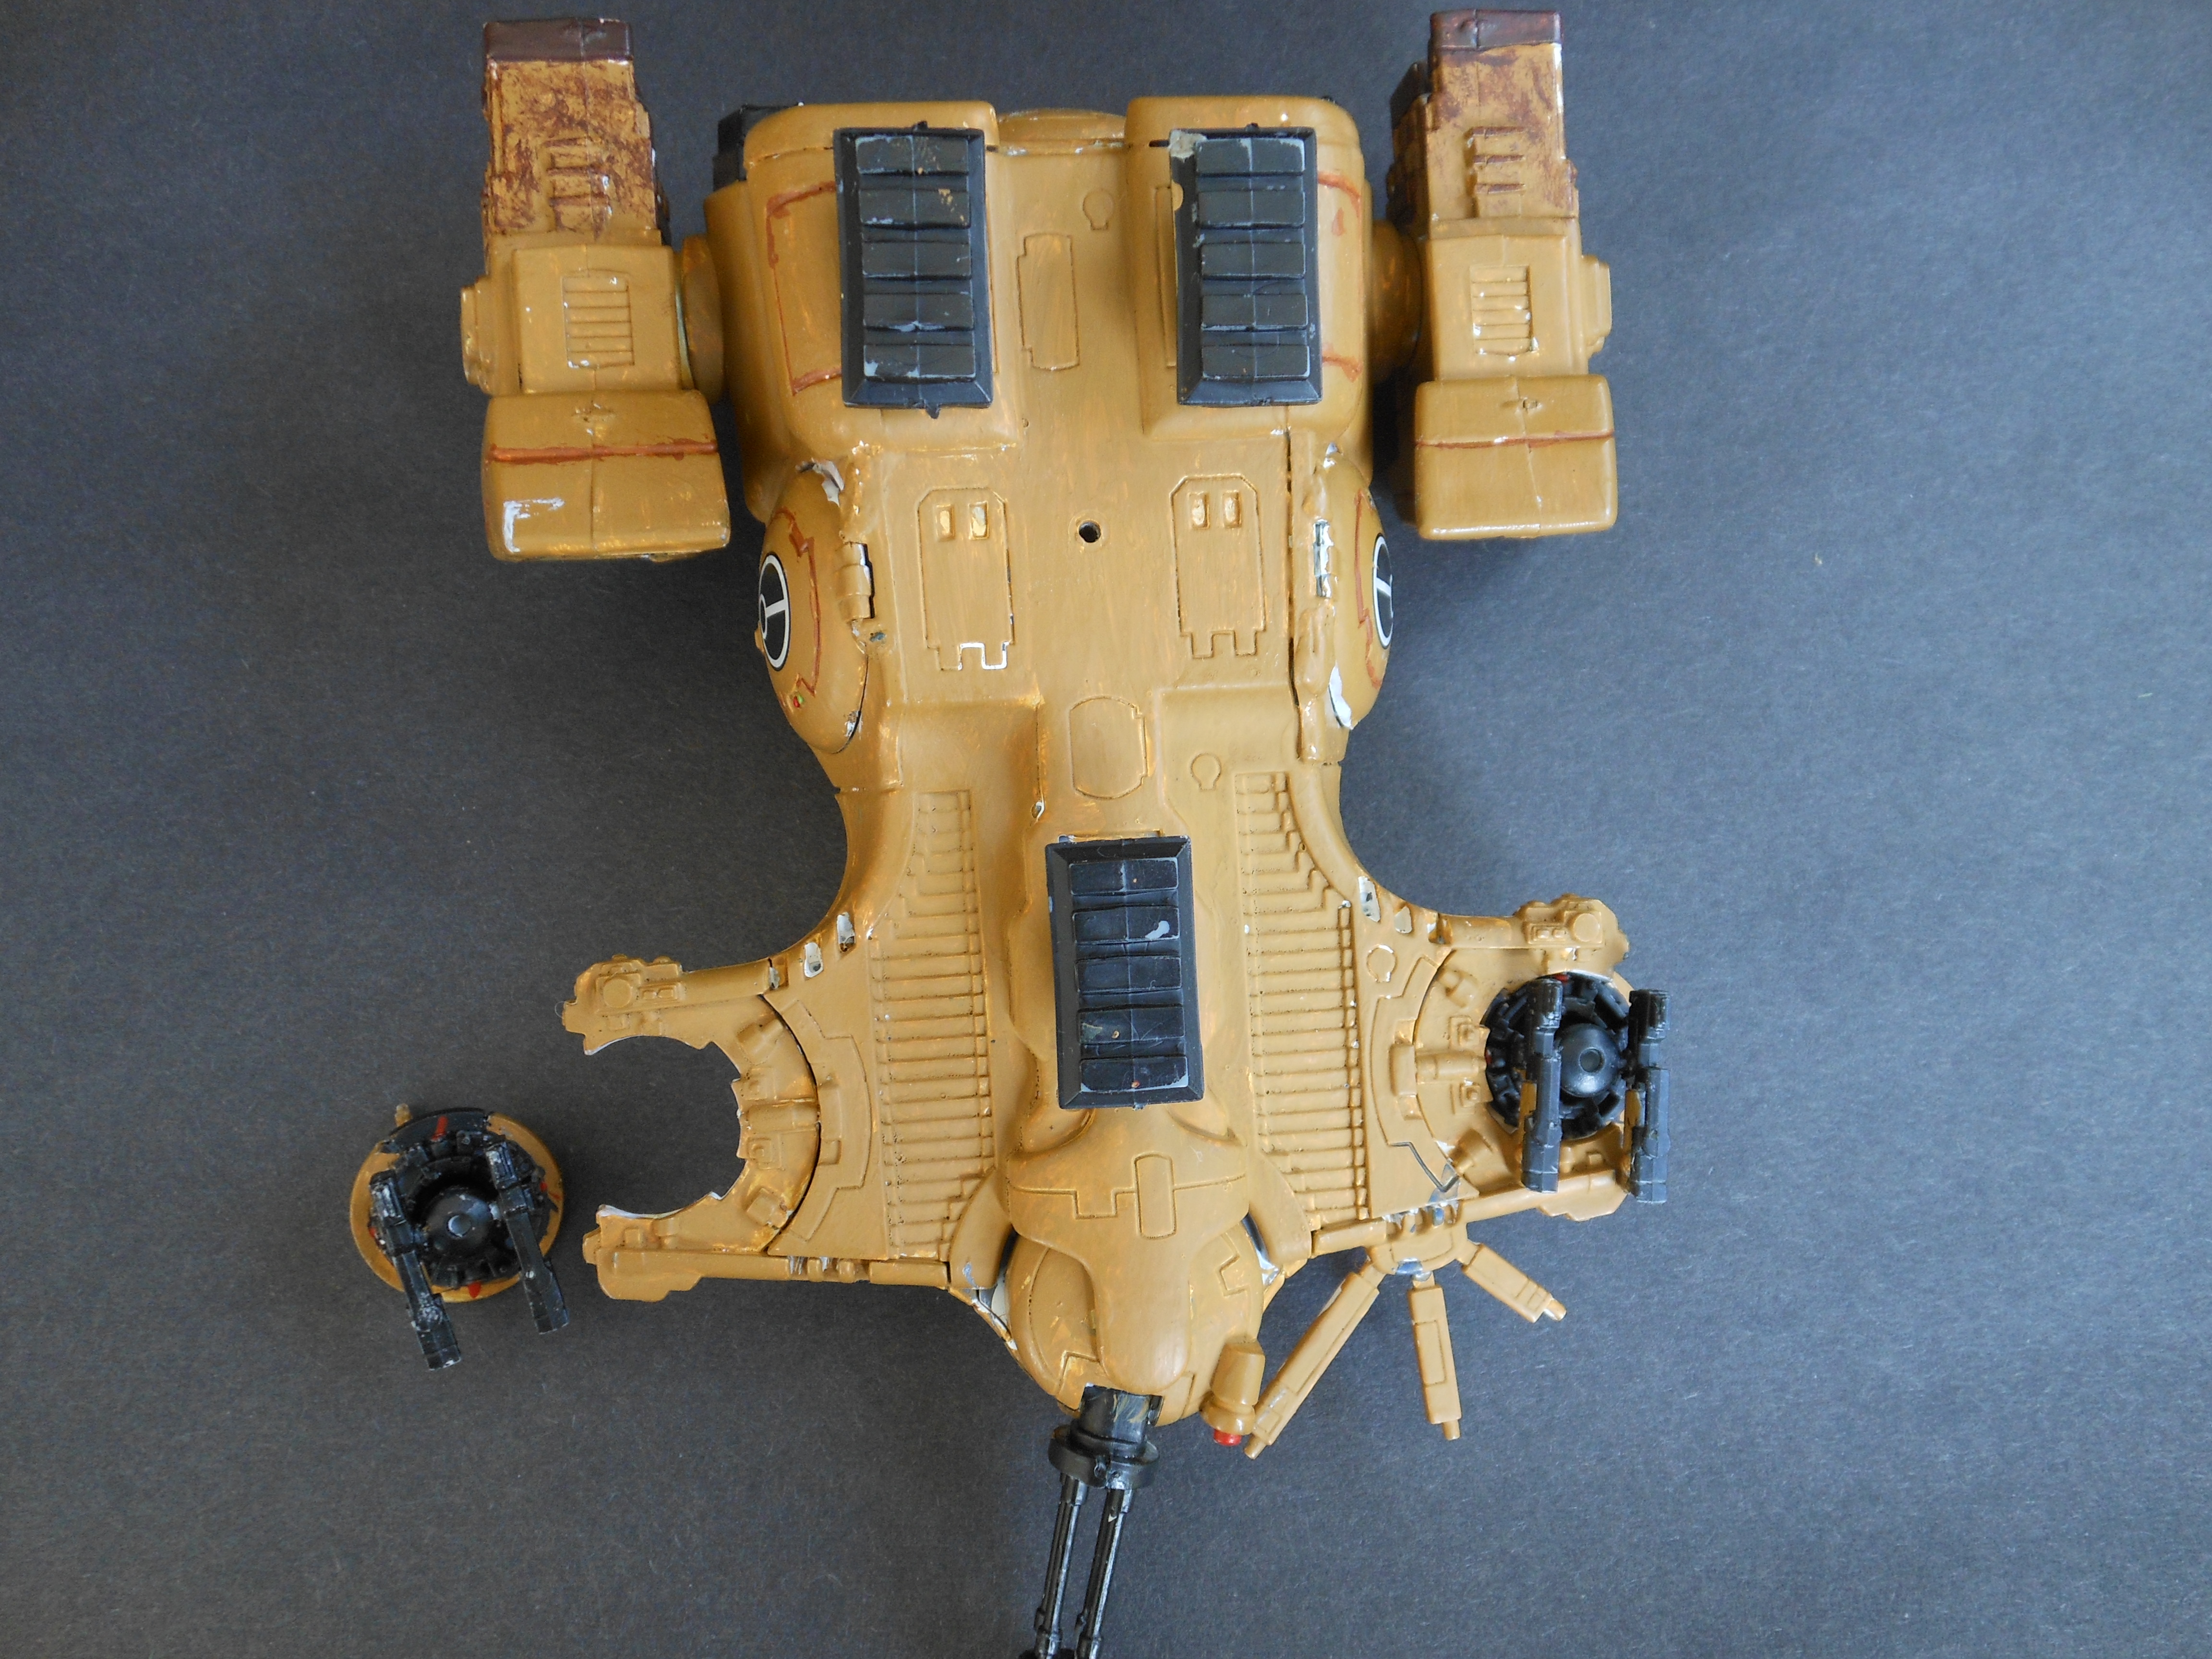
Now, here's where the plot starts to thicken. At around the time of my Tau army's tabletop debut in 2010, I was working on a sister ship for this Devilfish, which would have completely mechanised my Tau. This model got as far as to have its interior painted and its exterior undercoated....
... and never went anywhere after that.
What happened was that I still wanted the side doors to be articulated, but I still lacked the tools and know-how necessary to pin them on my own, and I no longer wanted to bother my parents about it so I decided to just leave it until I could perform the conversion unassisted. That ended up taking about three years, and by the time I had my own pin vice capable of handling such precision drilling it was 2013 and my hobby focus was dominated by Battlefleet Gothic and Warhammer, leaving the 40k side of things to fall behind.

This model is entirely unique in that it represents the first and only use of a brand new technology - airbrushing. In 2008 GW released a Citadel brand airbrush modeled in the shape of a 40k hand flamer, and while I wasn't really fully able to appreciate the shout-out I was motivated to get one because the White Dwarf showcasing it happened to use a Tau tank hull as a demonstration model and emphasised how easy it made getting a smooth colour on Tau tanks. And since smooth coverage of the skimmer hulls is the holy grail of Tau painters, I was very intrigued.
The Citadel Airbrush I ended up getting however proved to be less reliable than advertised. I got through about two or three coats on the front of the model before its inner workings glued themselves shut forever and refused to work, and the whole experience ended up souring me on the whole concept of airbrushing to this day. Fortunately my skills at hand brushing models ended up maturing to a level that made it largely unnecessary.
While the model's exterior was left on hold until the side doors could be pinned, I did work on the interior in the meantime. By this time I had largely given up on trying to break up the monochrome white and settled for plain white seats - though still with the same Vermin Brown leather upholstery because I value my troops enough to make sure they get whatever small comforts I can give them. There was plans to add stowage too, but they never materialised before the whole project was mothballed.
On the other hand I did end up putting in some transfers to liven the interior up a little bit. Despite having been a Tau enthusiast for almost a decade by this point, I had very little understanding of the difference between Tau letters and numbers, so at the time I assumed the transfers I was putting on were slogans and information labels like the ones featured in the Tau ship areas in Firewarrior. It was not until much much later that I discovered I had in fact covered the interior rather nonsensically in registration ID numbers.
The sides of the hull were left unpainted on the outside in anticipation of the hinge brackets being drilled, but I did eventually get to painting the side doors under the reasoning that they were easy enough to manipulate while separate pieces that they could probably be painted and then drilled without too much difficulty.
And that was how the Devilfish was left for over a decade, languishing in a half-forgotten cache of models, bitz and various hobby supplies while I focused on Tau starships and Wood Elves. It was not until 2018 that I remembered it was there and, seeing a perfect opportunity to give my new rebooted Tau army a 'free' transport vehicle, I resolved to turn it into the first new vehicle for my new Tau with a deep, deep, deep modernisation program.
The refit work began last year after I had finished the command team for my rebooted Tau. I started by carefully stripping off the outer hull with Simple Green. Normally I am deeply uneasy about paint stripping, being loathe to erase a piece of history and someone else's hard work, but plain undercoat primers are an exception and this was my own painting at any rate, and trying to work with the very thick caked up undercoat my 14 year old self had applied seemed like a bridge too far.
That said I did determine that the interior was worth salvaging, so I avoided stripping that while carefully taking the paint off the outside by using a system of jury-rigged scaffolding to keep the Devilfish hull suspended above the pool of Simple Green, with just one surface dipping into the liquid at a time. This was largely ineffective at keeping the Simple Green out of the interior, as the troop compartment got flooded through the flight stand hole in the floor and the cupola hole in the roof multiple times, but it was successful at preserving the interior paint job, which was left relatively intact with no serious solvent damage. Though it does even now still have a sharp citric cleaning freshener smell inside...
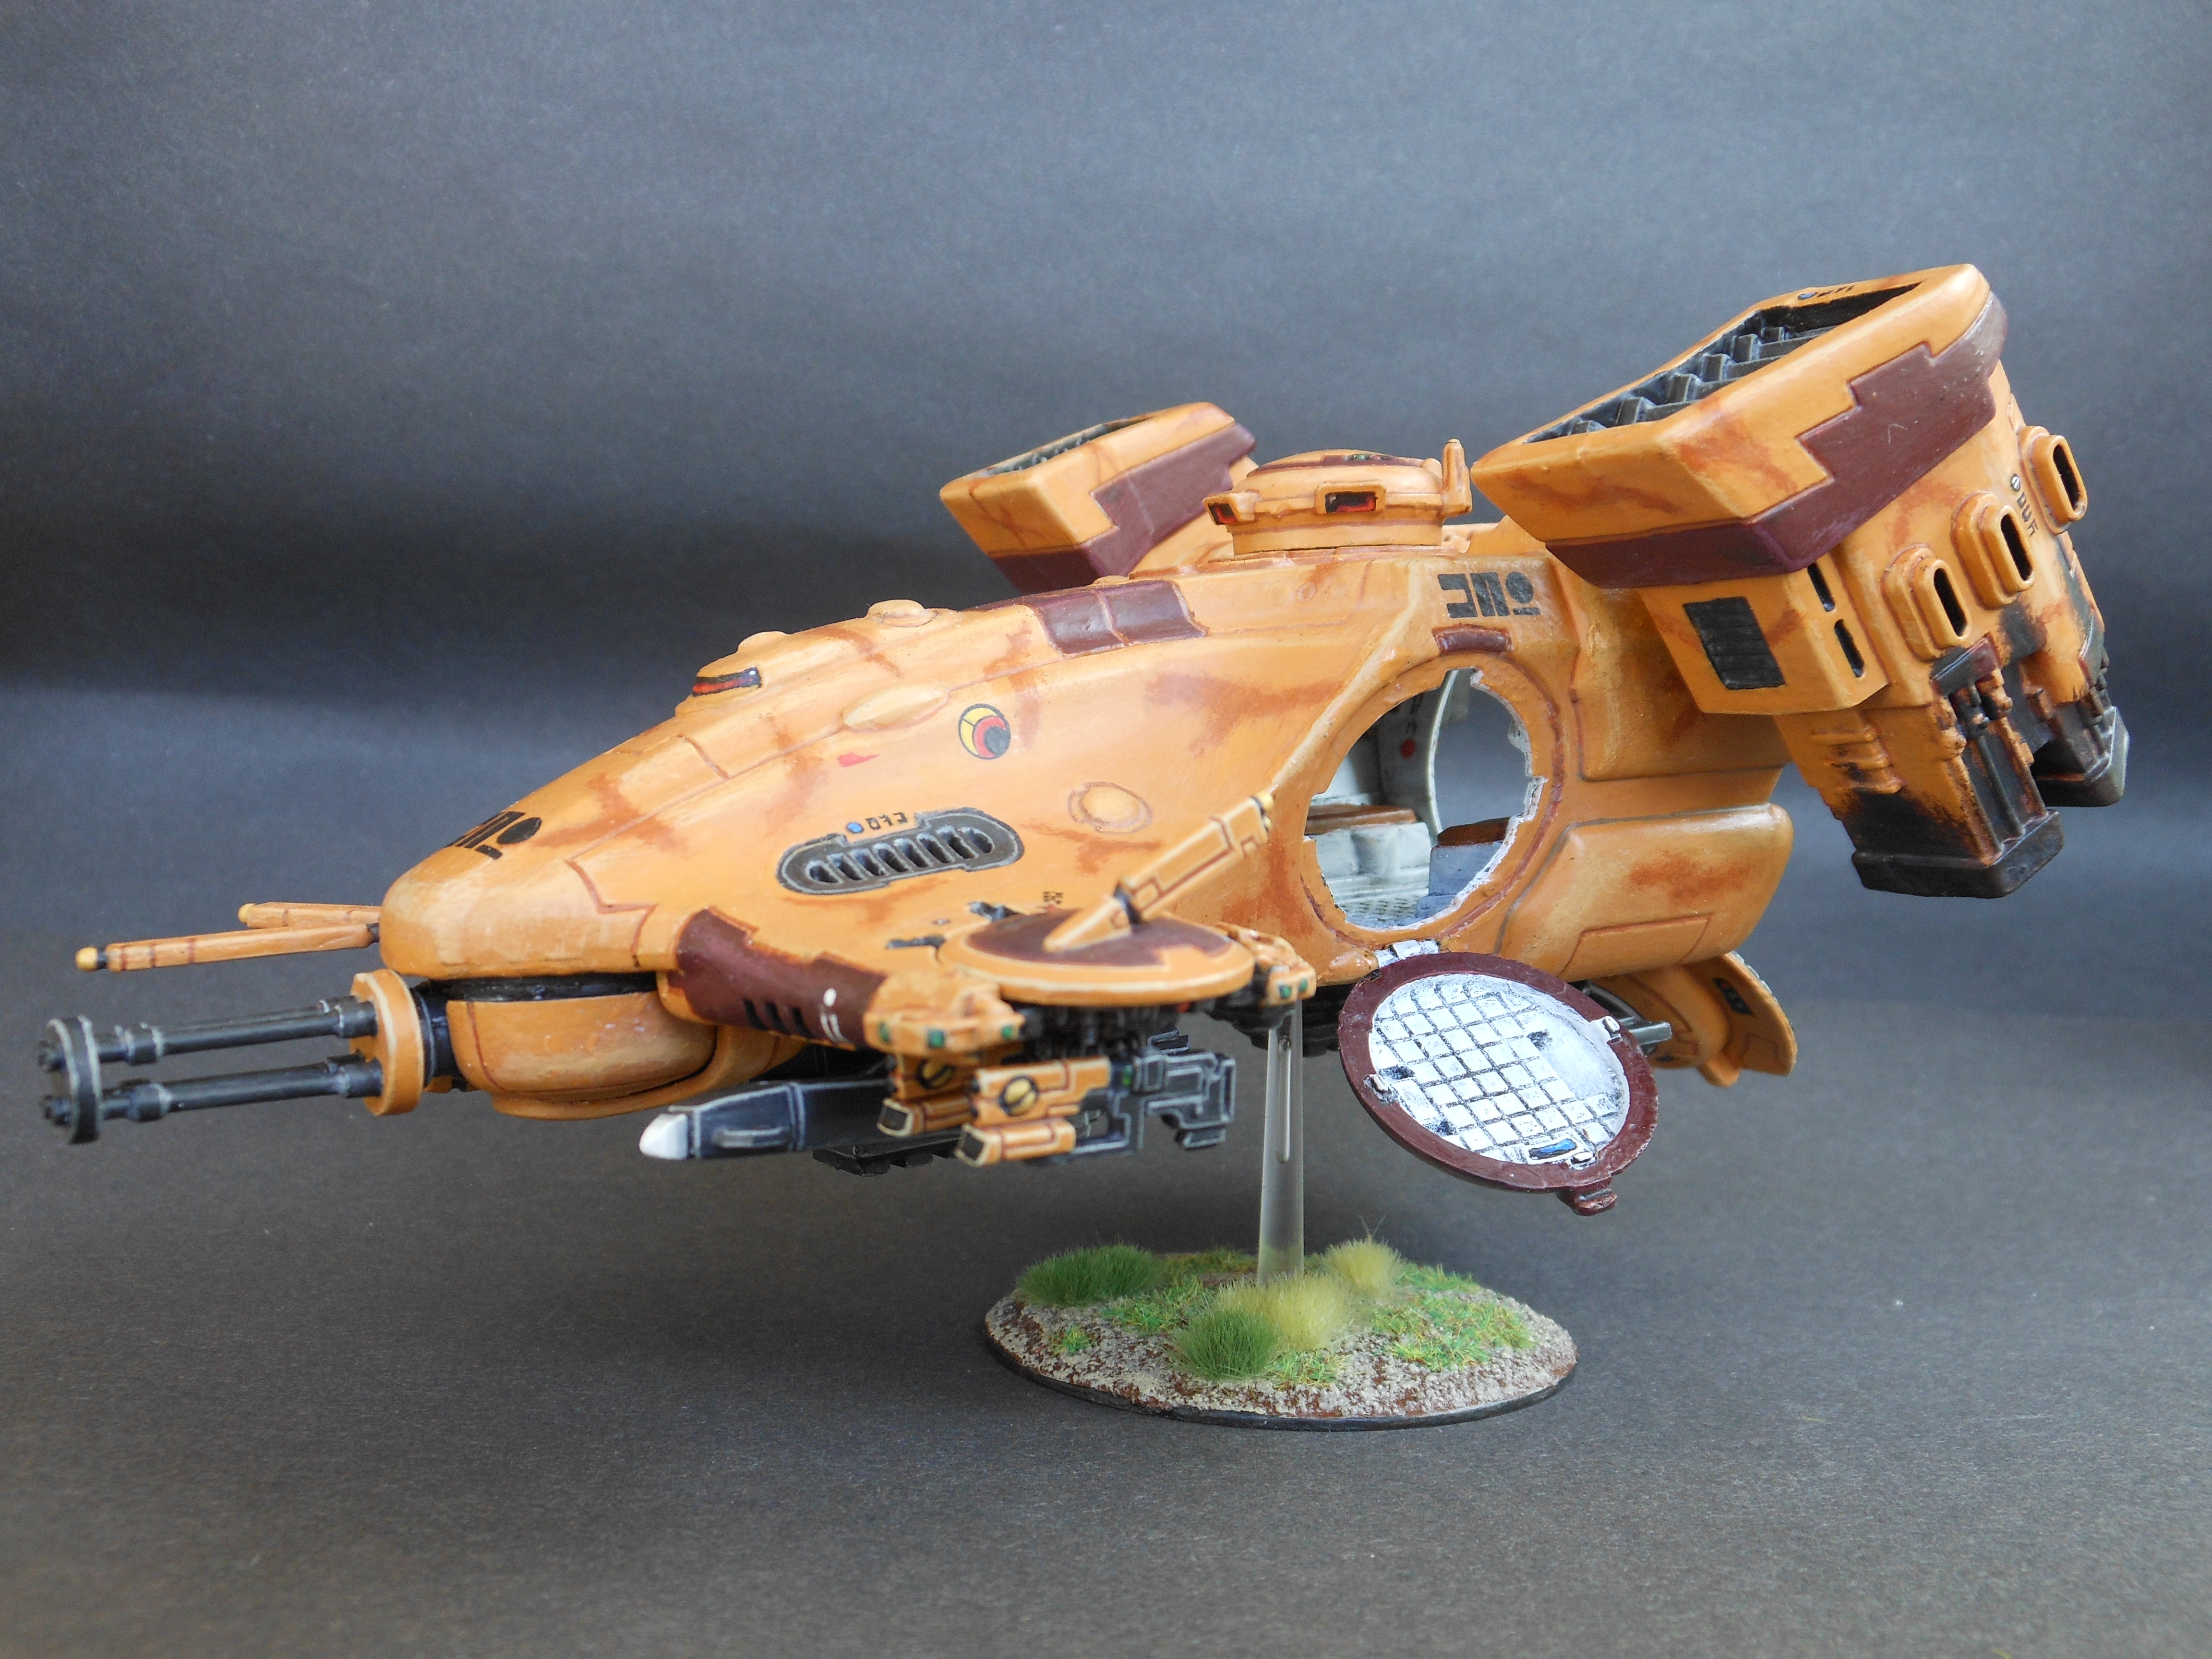
With the white undercoat taken off, the upgrade work could begin, and this Devilfish, the missing link between my old Tau army and my new one, was REBORN.
I can only pray I have made Xzibit proud.
This new Devilfish was unsurprisingly painted up following the exact process outlined in Codex: Tau, with a level of fidelity that my 10 year old self could only dream of. In particular this is the first success I've had in implementing the iconic Crows' Feet camouflage pattern featured on the GW studio tau army's vehicles.
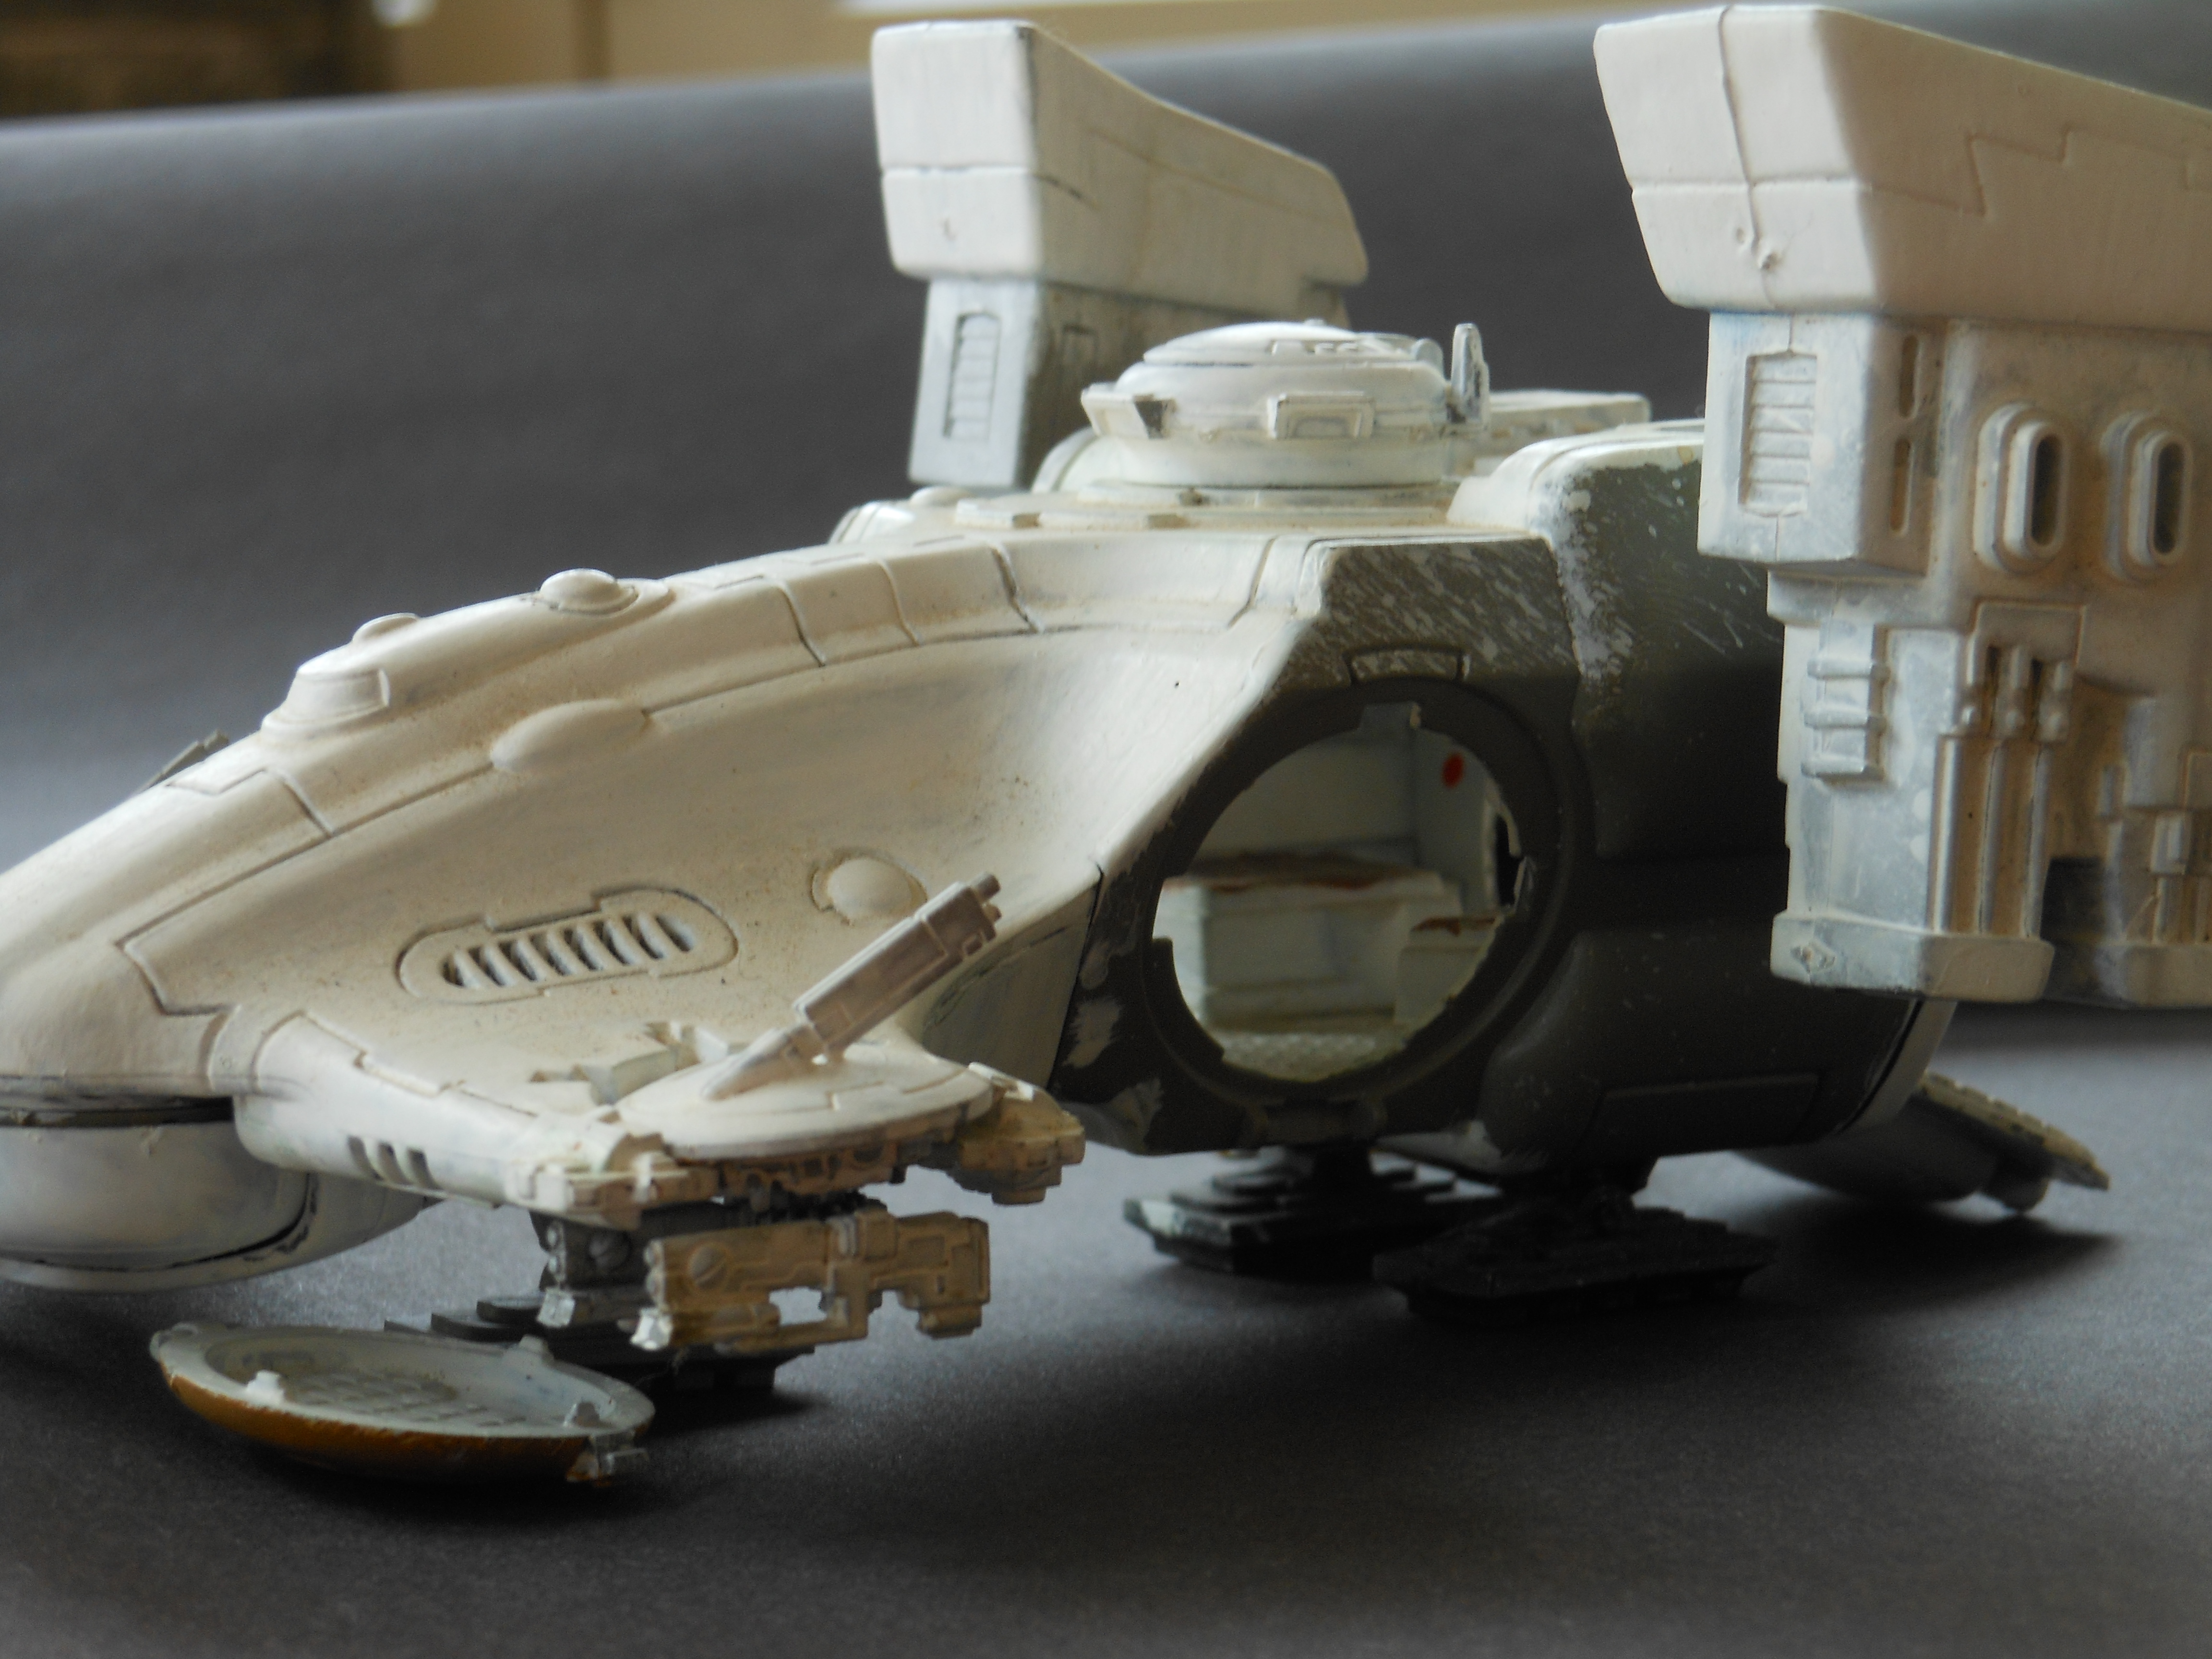
It wasn't easy of course. The size of the model meant that it was a massive slog to get painted, but crucially it was noticeably much less of a slog than those damned battlesuits. Much of this was due to this model being big and vehicular enough to attack with a tank brush for basecoating, and big and smooth enough to be attacked with a makeup blush brush for highlighting (another tip gleaned from Sebastian Stuart). This meant a lot of rapid progress for a lot of the larger open areas of the model that mostly bogged down around the clusters of greebles scattered over the model - the landing gear in particular were especially troublesome.
The chin turret was also a major headache due to the friction caused by having such a snug fit. Ideally this piece should really have been painted separately and rigged up to be detachable for both upkeep and to model Weapon Destroyed damage results, but 14 year old me was not that smart.
The largest problem by far however was clearcoating the beast. Some application of an improperly mixed varnish ended up causing huge swathes of the model's recesses to fog over with this disgusting crusty white residue, which then plagued me for many days as it just would not stay gone, returning paint touchup after paint touchup no matter what I tried. I thought I had solved the problem at last with many many touchups followed by a coat of pure varnish, but even now it seems to be starting to creep back in. It seems that this particular TX-6 is cursed to live an ignominious career as a tyrannical hangar queen.
But then that's just how the march of technology goes sometimes.
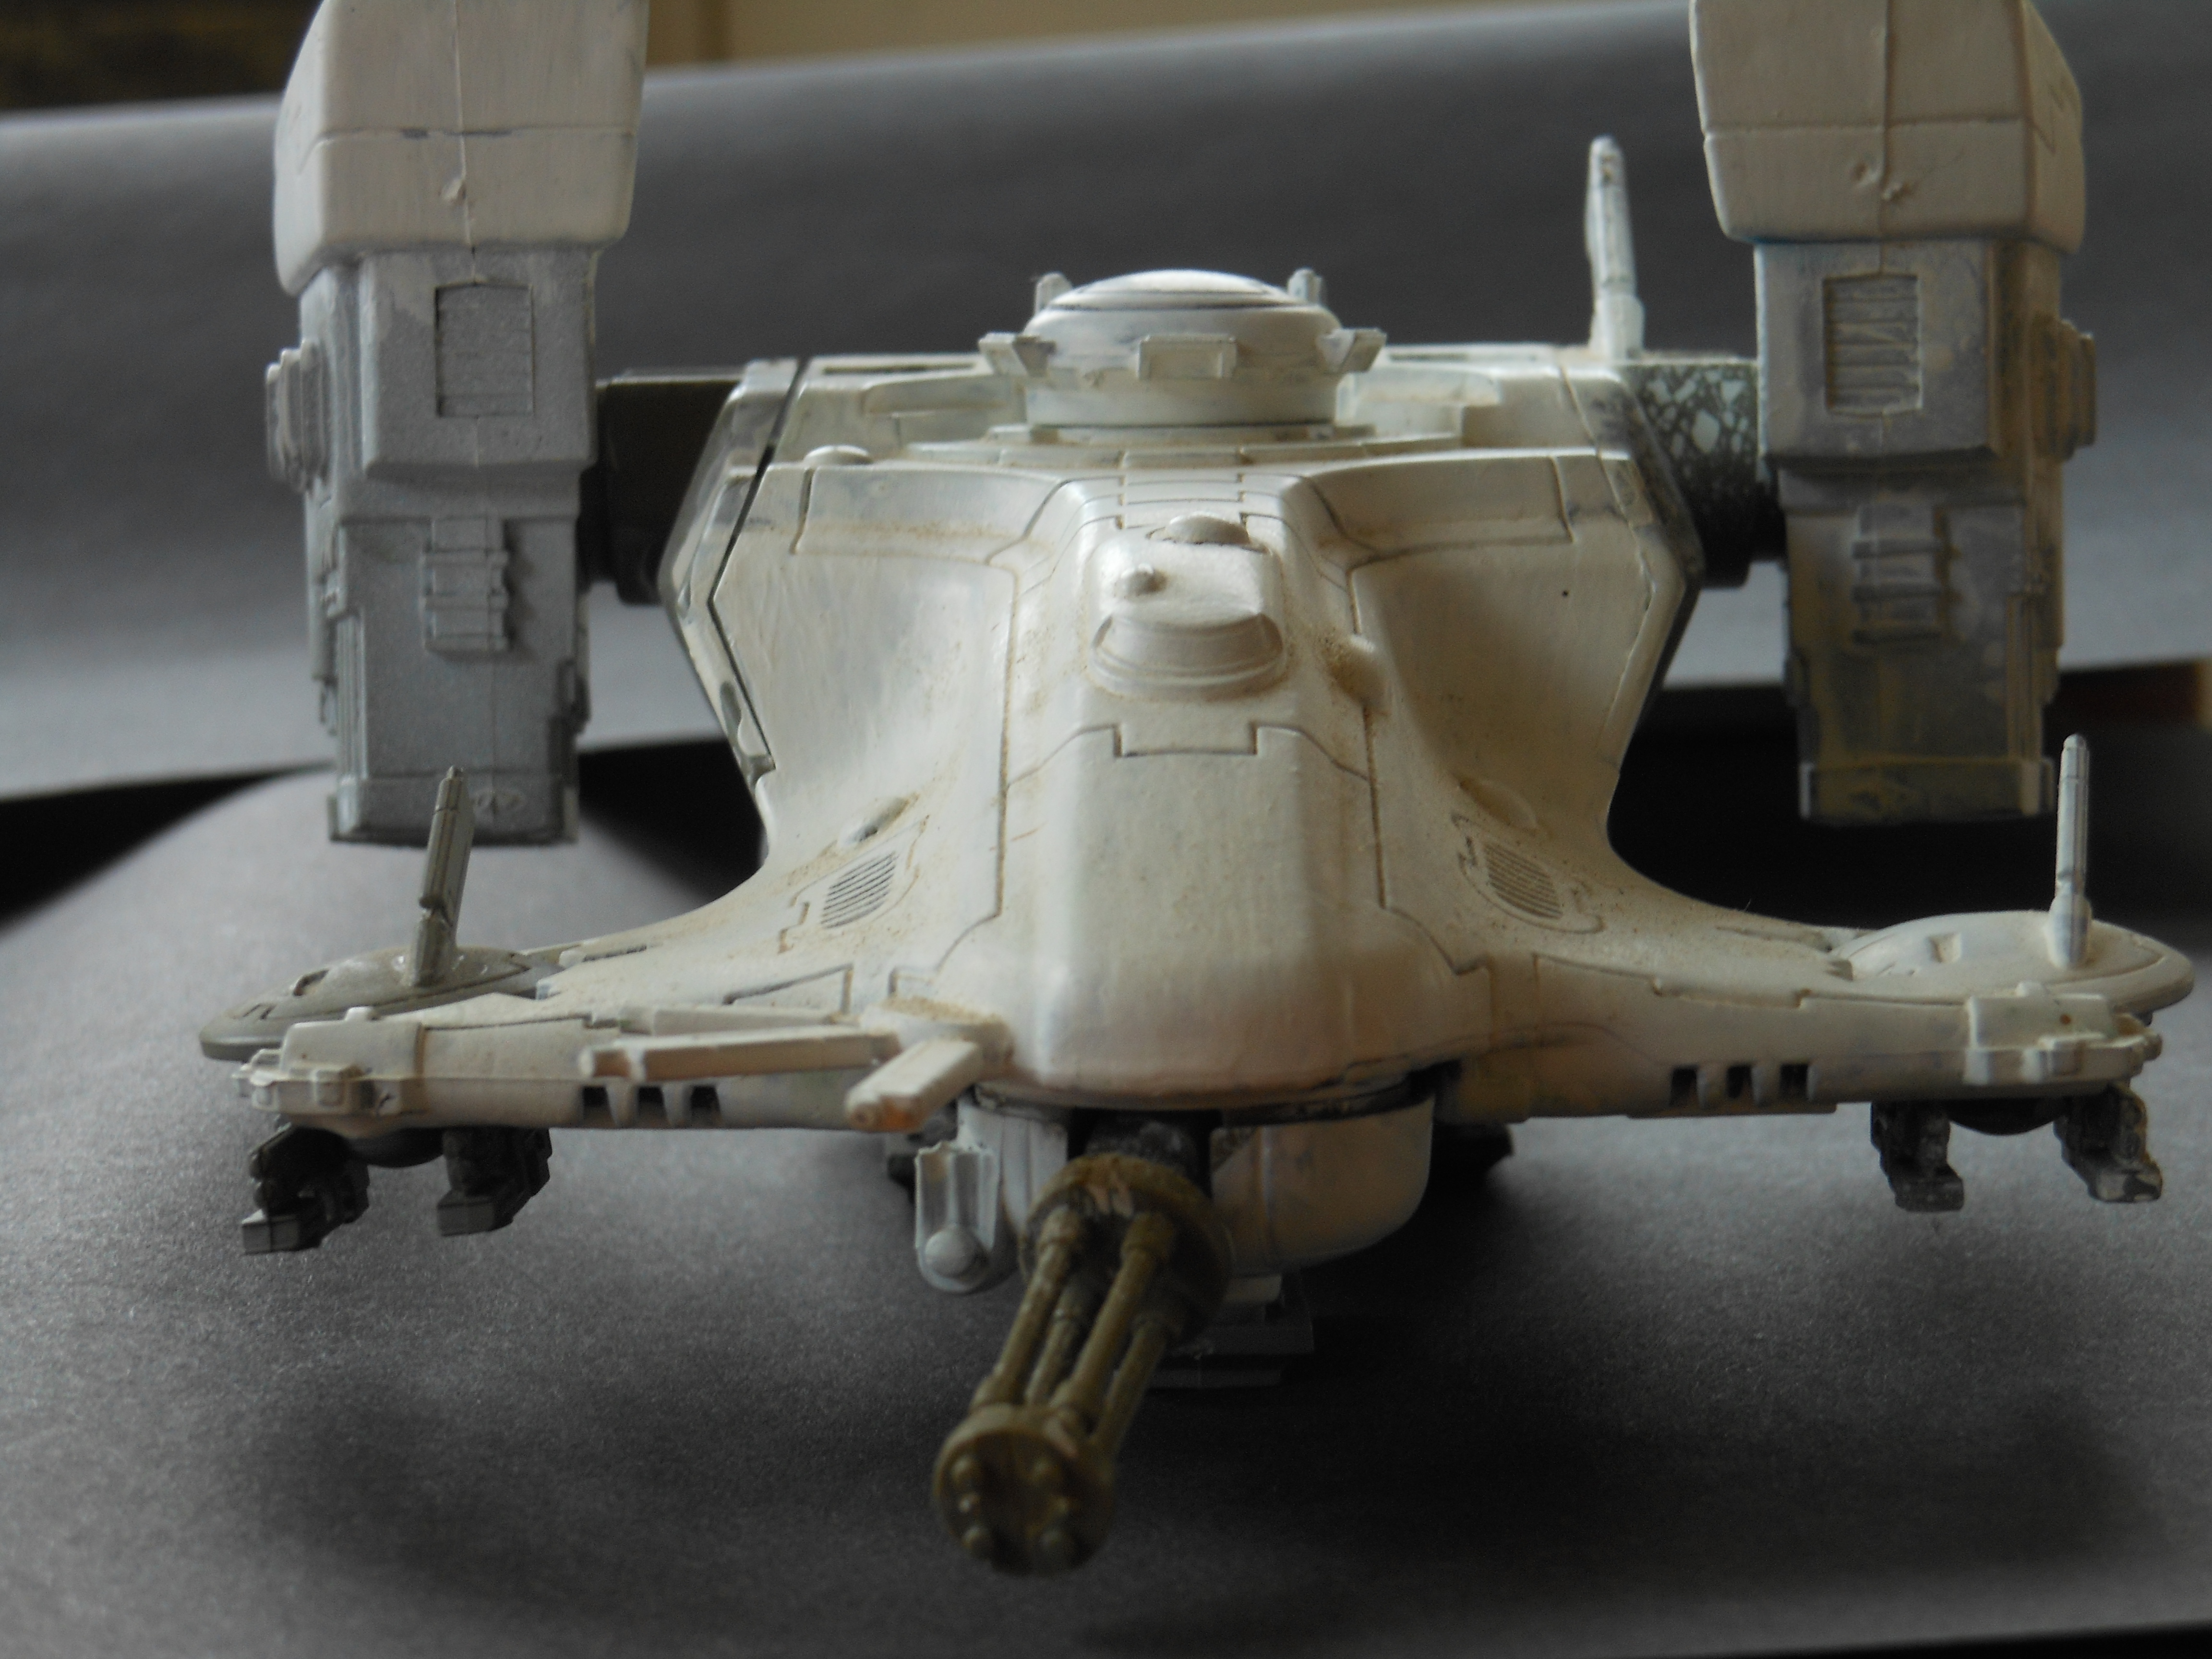
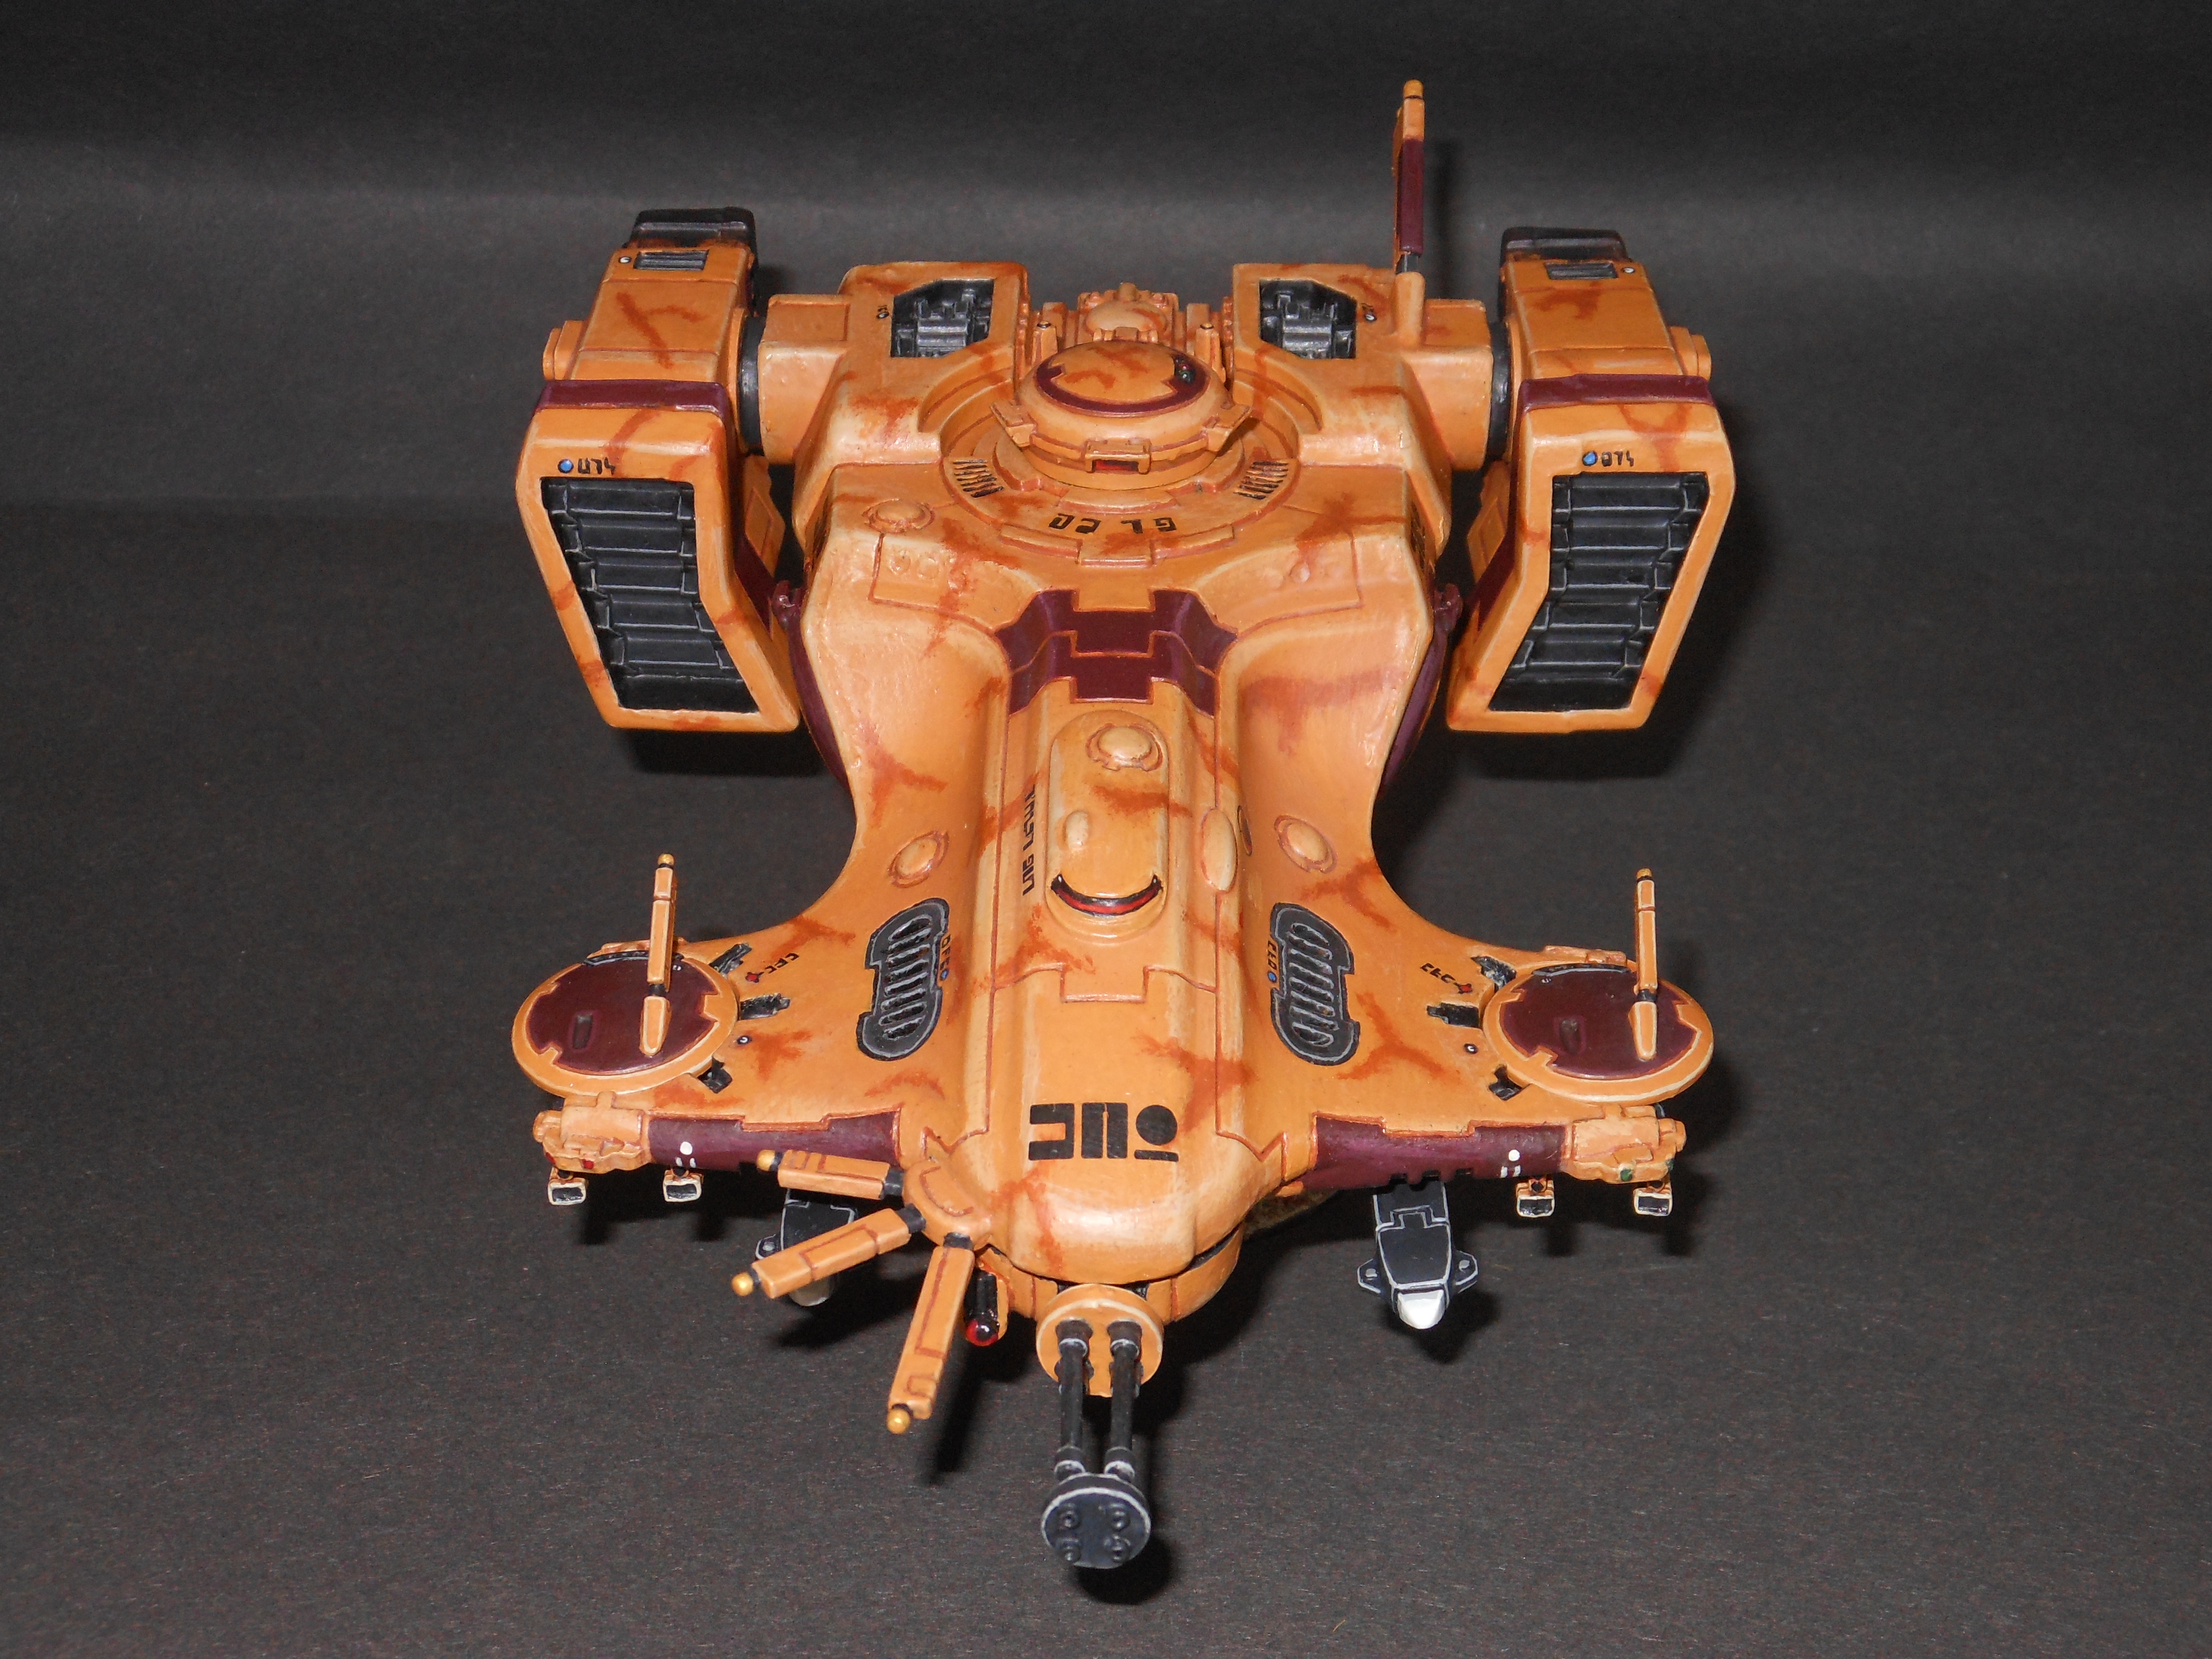
The rear of the machine shows off one of the many firsts for a 40k vehicle I've painted - a full set of engine glows. These were done using the same rough colour scheme as the engine glows on my Tau ships for Battlefleet Gothic, building up from red to yellow to orange to white in the centre of the thruster. The main difference was in a more detailed range of colour shades to fit the larger scale of Warhammer 40,000 models, as well as a white undercoat to compensate for the colours being drybrushed rather than simply layered.
The orange engine glows also mark the first decisive action in my WAR AGAINST BLUE GLOWS. They were fine in Firewarrior, and they were OK in District 9, but then after that every single fucking sci fi movie has just put made every glow and explosion electric blue and after 15 years of it I just can't take it anymore. ESPECIALLY with Tau since every last Tau player and artist seems to only ever give Tau stuff blue glows everywhere because of Dawn Of War, and it just feels so lazy and it looks so monotonous and I'm so so tired of seeing them everywhere.
So in my new Tau army there's not going to be a single blue glow. Anywhere. At all.
Starting with the engines on this Devilfish.
The other notable feature on the rear of the Devilfish are the rear-facing sensor clusters at the bottom, which have been painted up in multiple colours as a throwback to the rainbow lights on my older vehicles, with a little uniformity added in - the main lenses are red and green, which is a recurring colour motif throughout the army and taken directly from
Codex: Tau and
Firewarrior, while the smaller lenses are asymmetrically coloured to add a splash of visual spice.
The underside showcases what is perhaps the most dramatic new addition over the previous models, a massive increase in firepower from a set of magnetic hardpoints for a full payload of seeker missiles. It was always my plan to eventually equip all the Devilfish of my Tau army with the maximum number of seeker missiles they can carry. This is rooted in my longstanding doctrine of ensuring that every single unit in my armies is equipped with anti-tank capability as well as anti-personnel weaponry, to ensure they can defeat any threat they encounter. And also because as I've mentioned before I had a strict policy of no battlesuits so I needed something to cover the middle ground between pulse guns and railguns. More recently discovering the Soviet army practice of ensuring every single unit had some way of hurting tanks only vindicated this approach. Besides, it's just not a proper infantry combat vehicle without a good anti-tank missile launcher bolted on.
Much consideration was made to the placement of the seeker missiles, a question that my engineers have wrestled with for decades. At one point over-wing mounts on the top of the prow were considered. So too were a cupola mount, and sticking them on the engine mounts or on the top or underside of the engines themselves. In the end, I settled on a conventional under-wing configuration on the prow, which was simple and made plenty of sense from a design point of view. But this then raised the question of how to fit four seeker missiles under the prow of the Devilfish, which was not a lot of space to fit four big honking cruise missiles. My first plan was to take some inspiration from real life Raketnosets and opt for an interleaved stack of missiles clustered around the central keel in a similar manner to the TU-95K-22 missile carriage.
But then I discovered that the weapon stations on the tips of the prow wings were actually smaller than I first thought and it was possible to stick a big cruise missile right next to them without getting in the way of any gun drone docked there. This made the overlapping layout unnecessary, provided two missiles were kept right next to the central keel.
The missiles themselves are taken from the Skyray, because the Hammerhead kits these days come with a Skyray sprue, and since I plan to build more Hammerheads than Skyrays I have a surplus of Skyray seeker missiles, which is great because I need a lot of seeker missiles, and each Skyray sprue gives me six of them which is five more than the lone seeker missile on the Tau vehicle accessory sprue, and Forgeworld no longer sells booster packs of seeker missiles.
They have been slightly modified with the addition of missile pylons modeled on directly, which in the case of the central two is necessary to give them enough clearance over the central keel, and provides enough area for sticking down a pair of magnetic metal pins so they'll stick to the magnets embedded in the prow. There are also a number of magnetic hardpoints installed around the top of the hull so that the Devilfish can be fitted with specialised mission equipment in the future.
The other notable feature on the underside is the prominent anti-gravity arrays on the prow, picked out in gold as both a shoutout to my first vehicle model and to tie in with the gold anti-gravity gyros on the infantry and battlesuits.
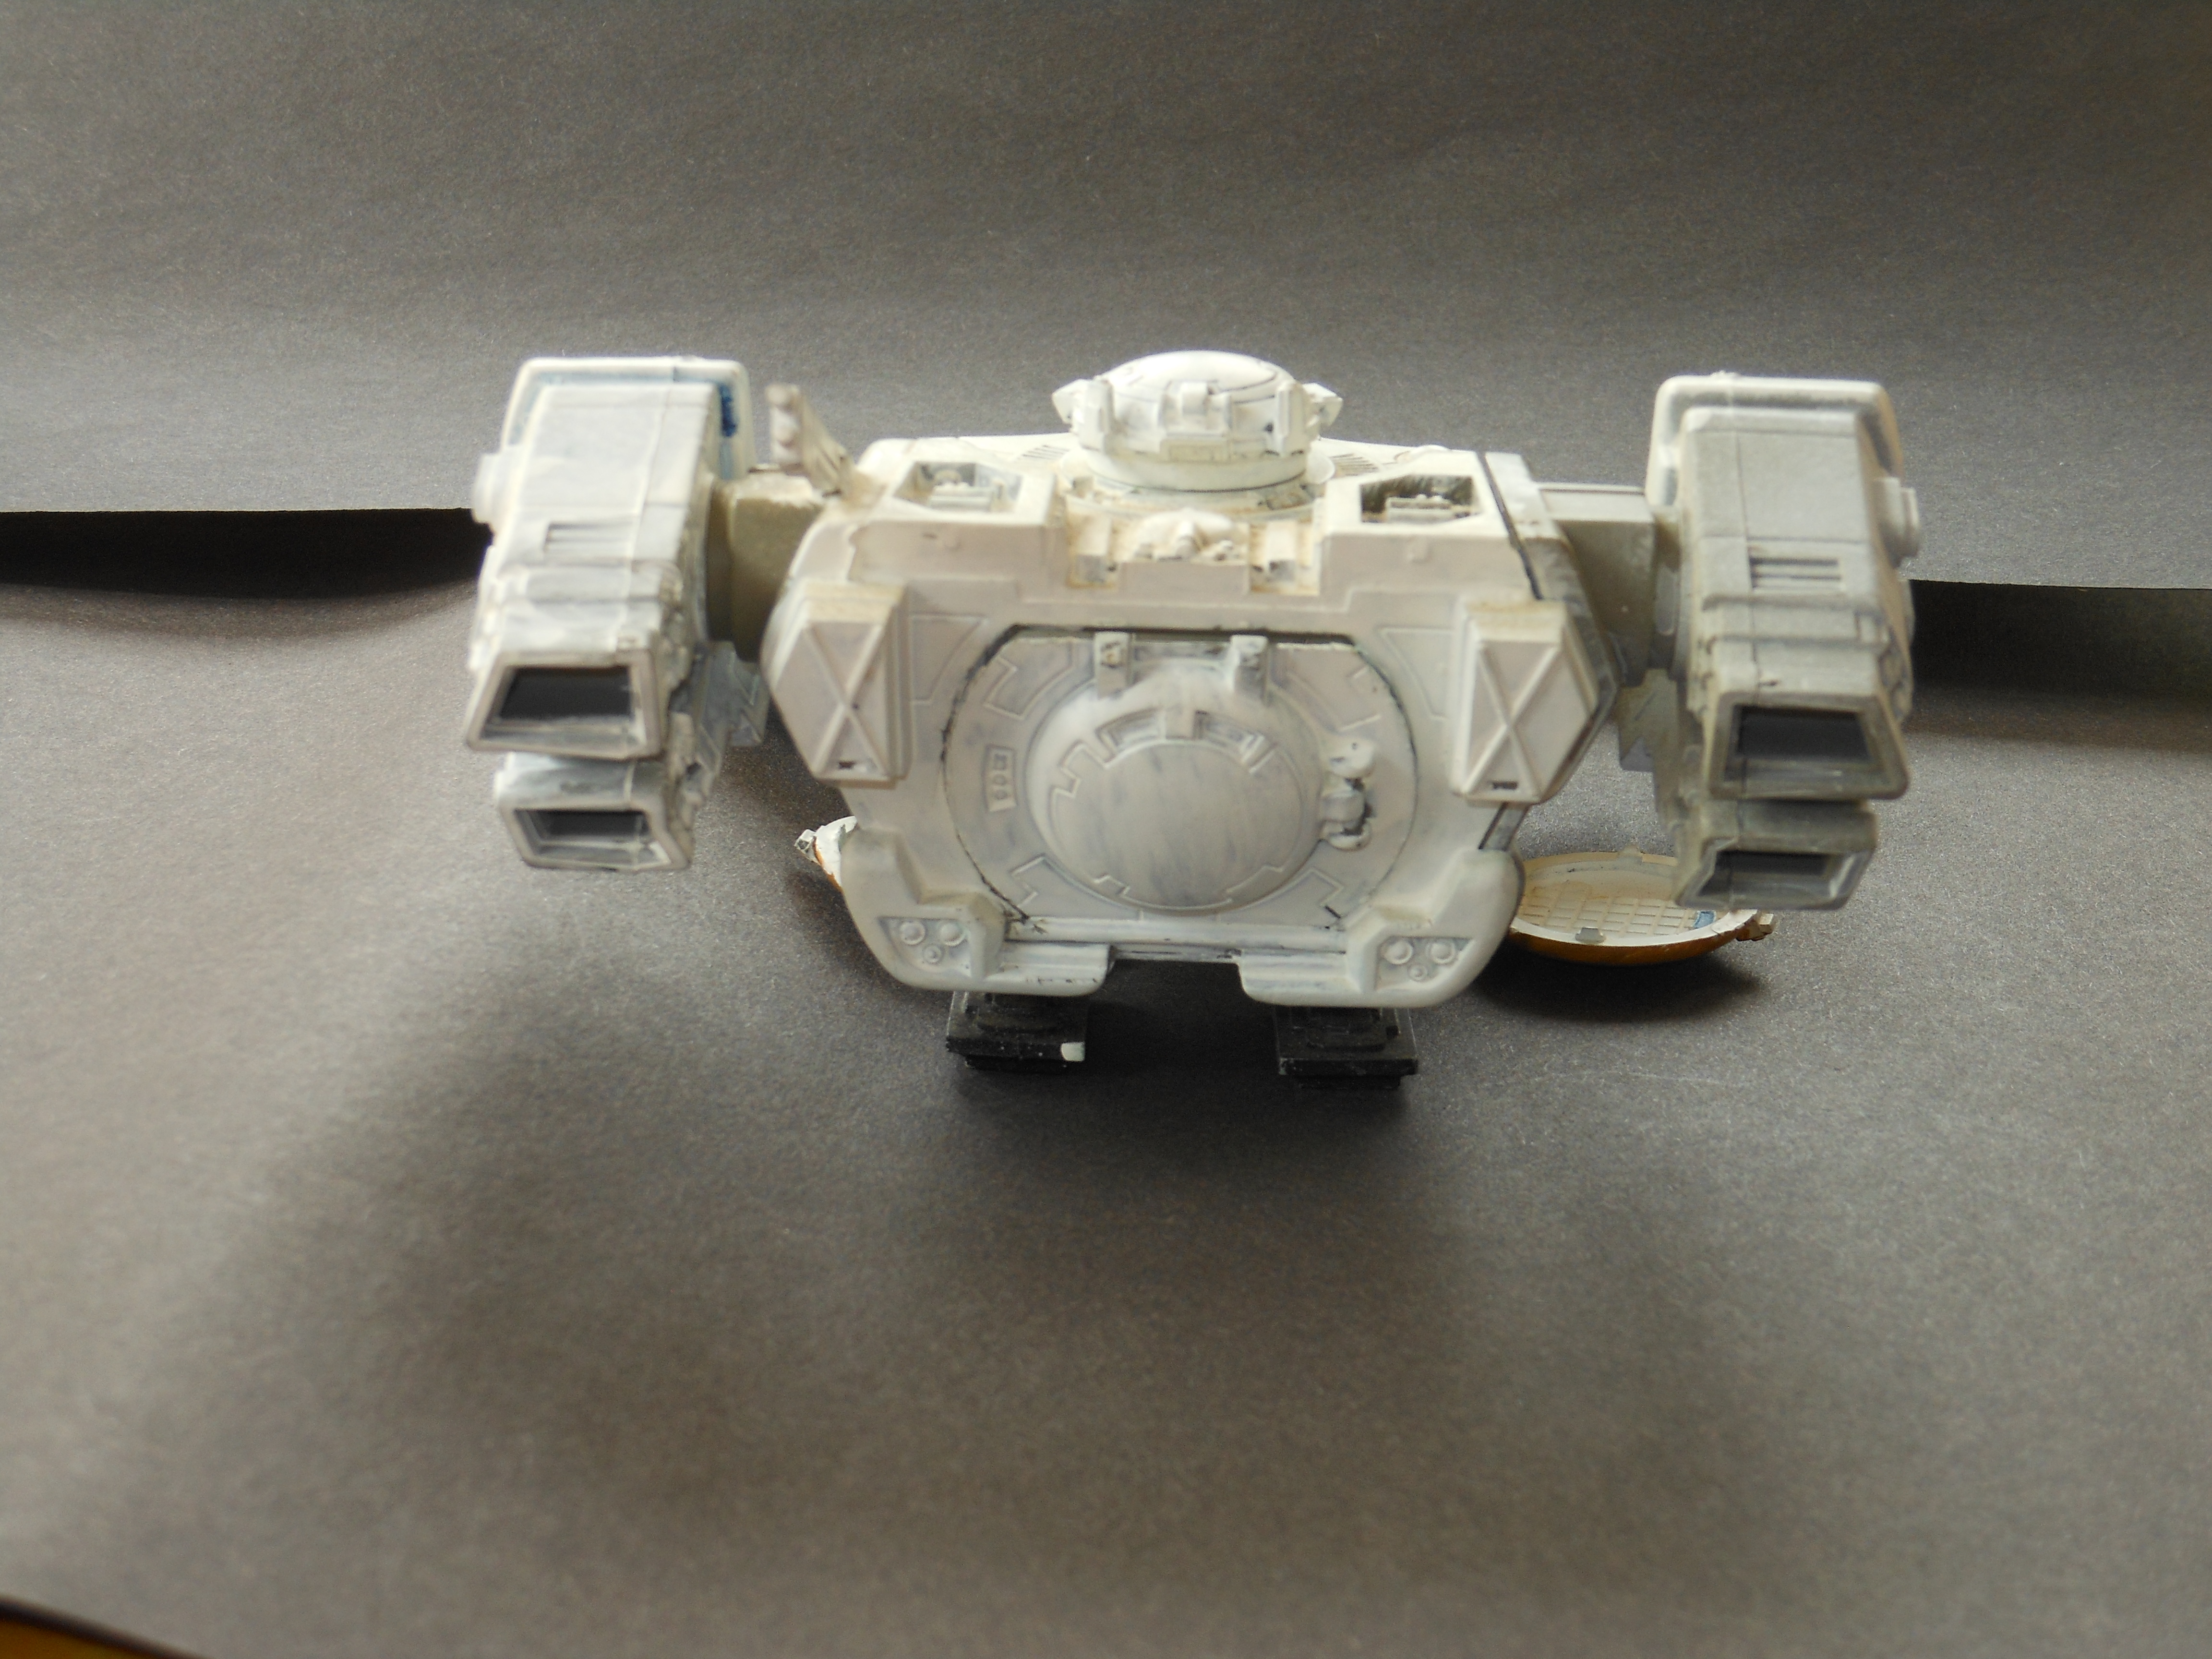
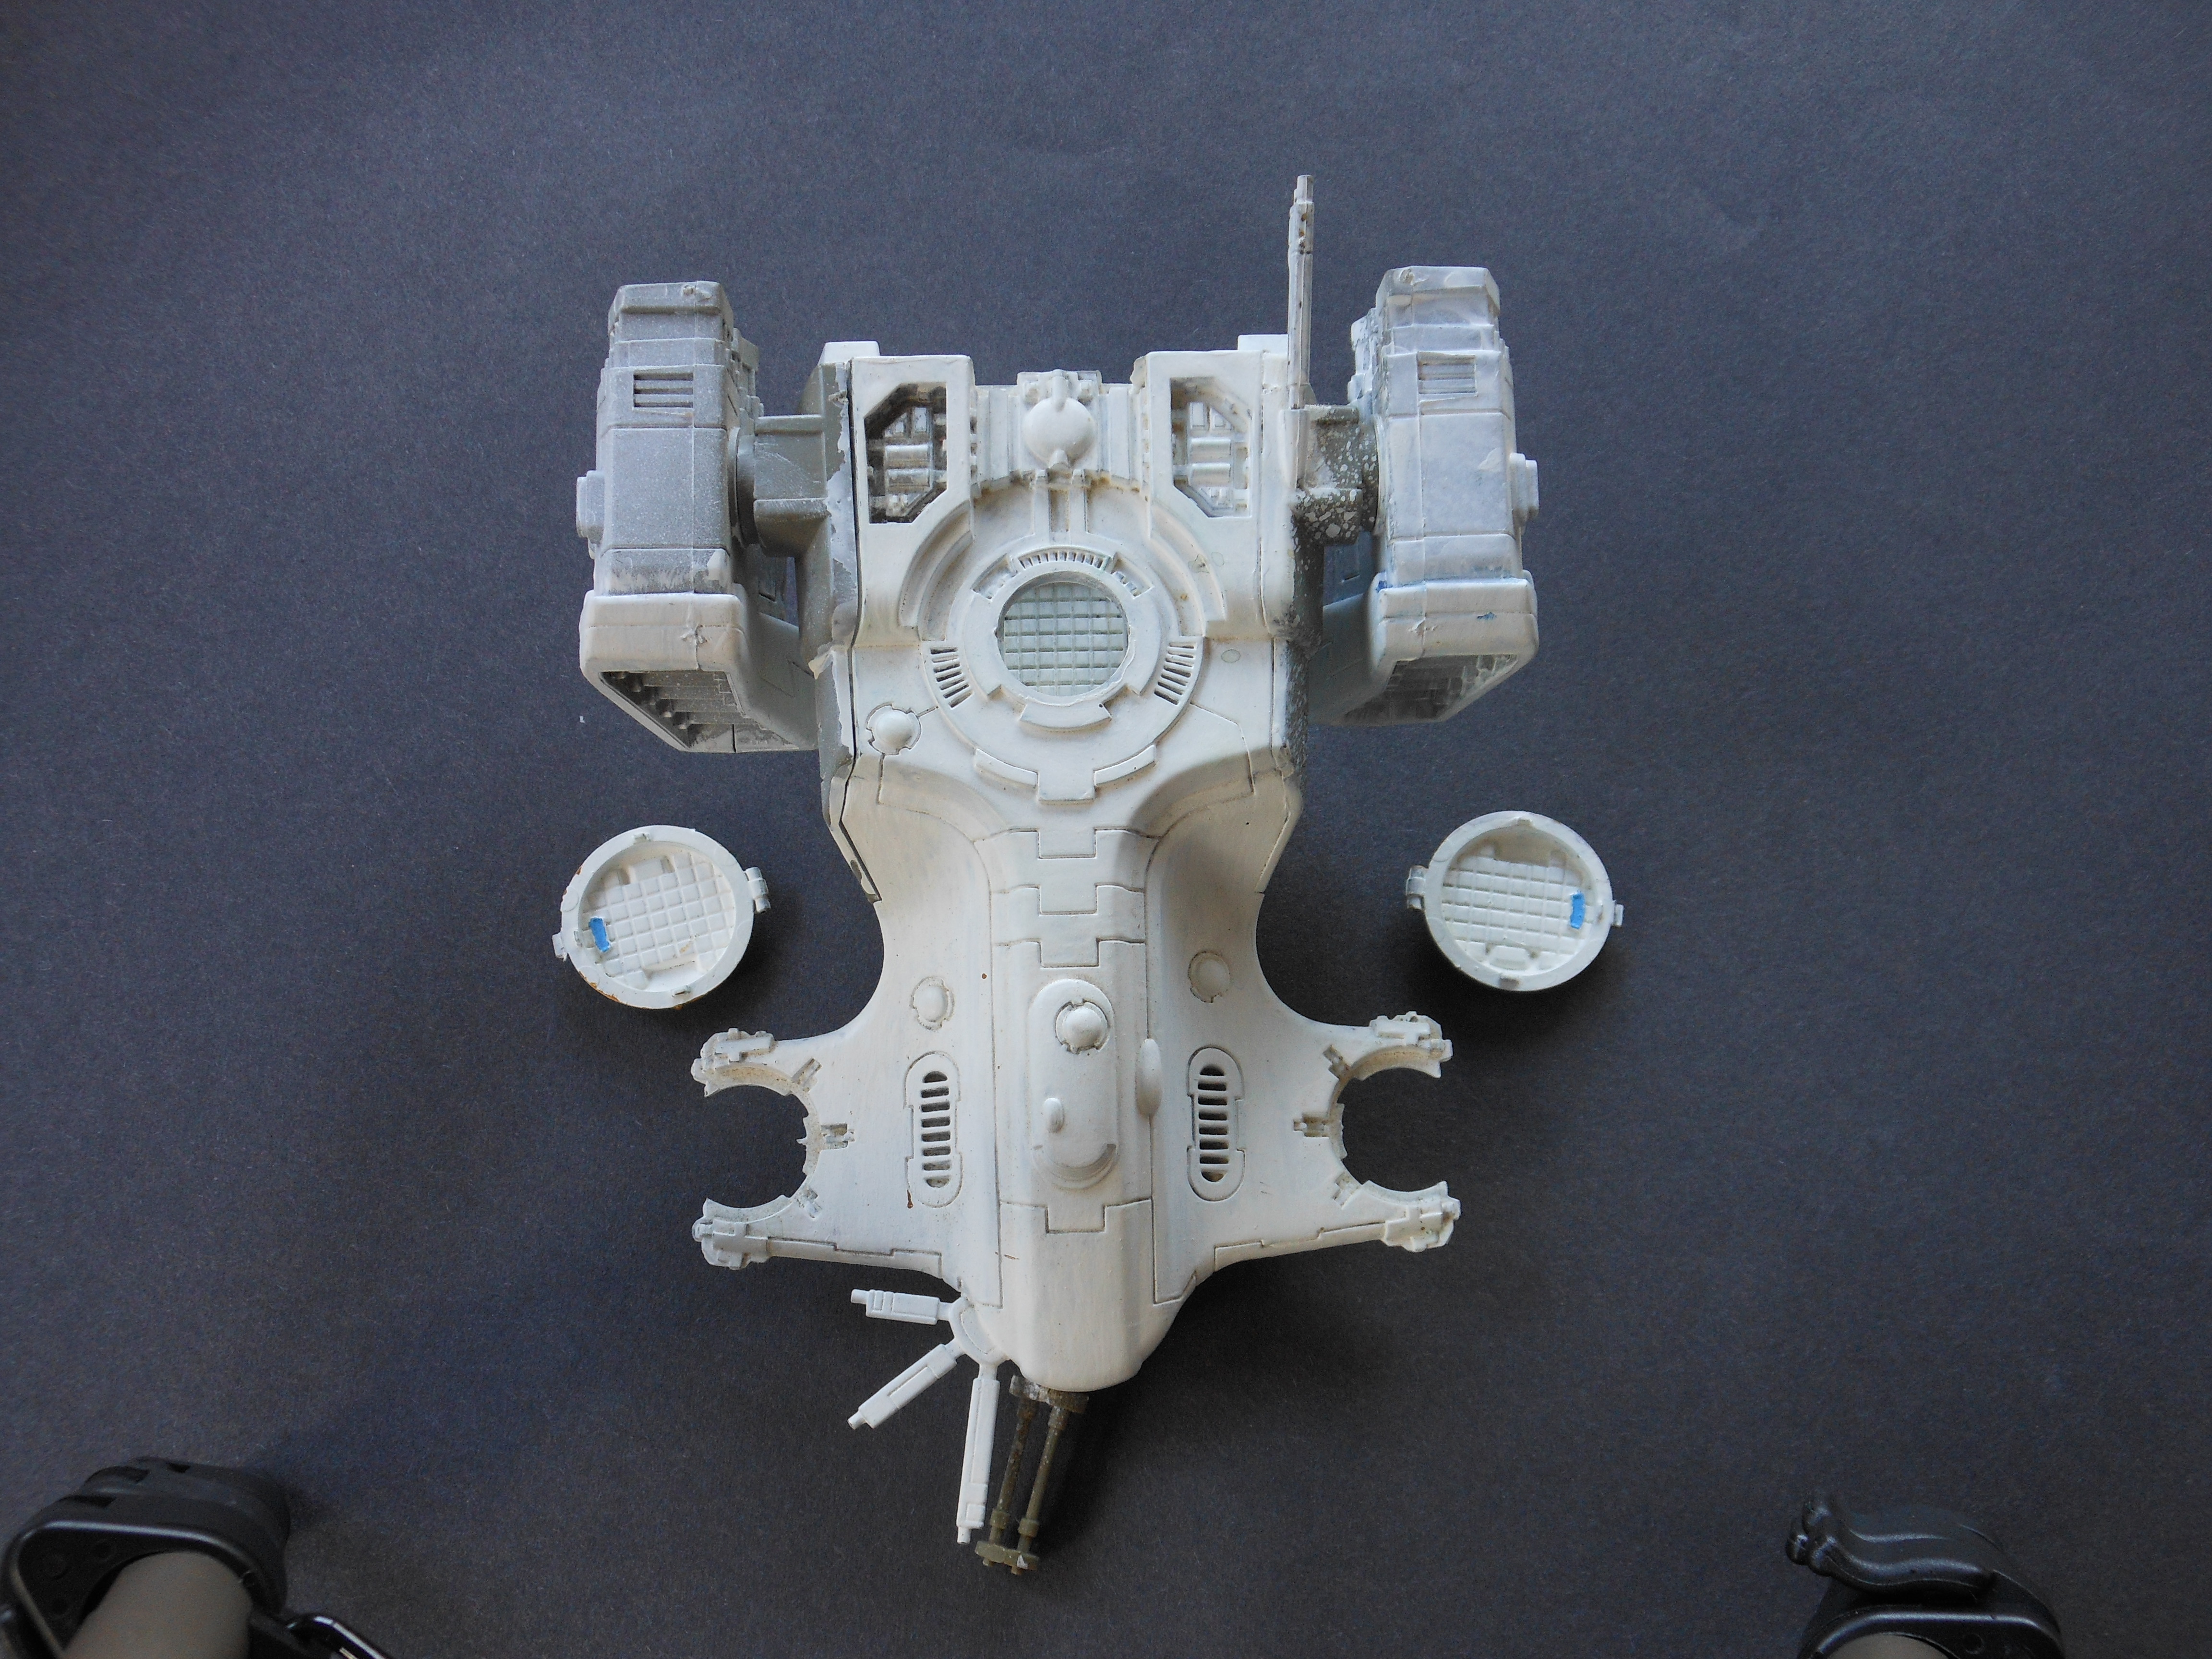
Like her predecessor, this new Devilfish also features fully articulated side doors, this time secured with paired sets of magnets. The hinge installation did not go smoothly, as my wonky depth perception and spatial awareness meant the shafts drilled through the hinge pieces were not completely level, making the resulting axis of movement for the door awkward. In the end I had to destroy the hinge brackets in order to save them, with the remains being assimilated into the greenstuff fairings added to accommodate the pins.
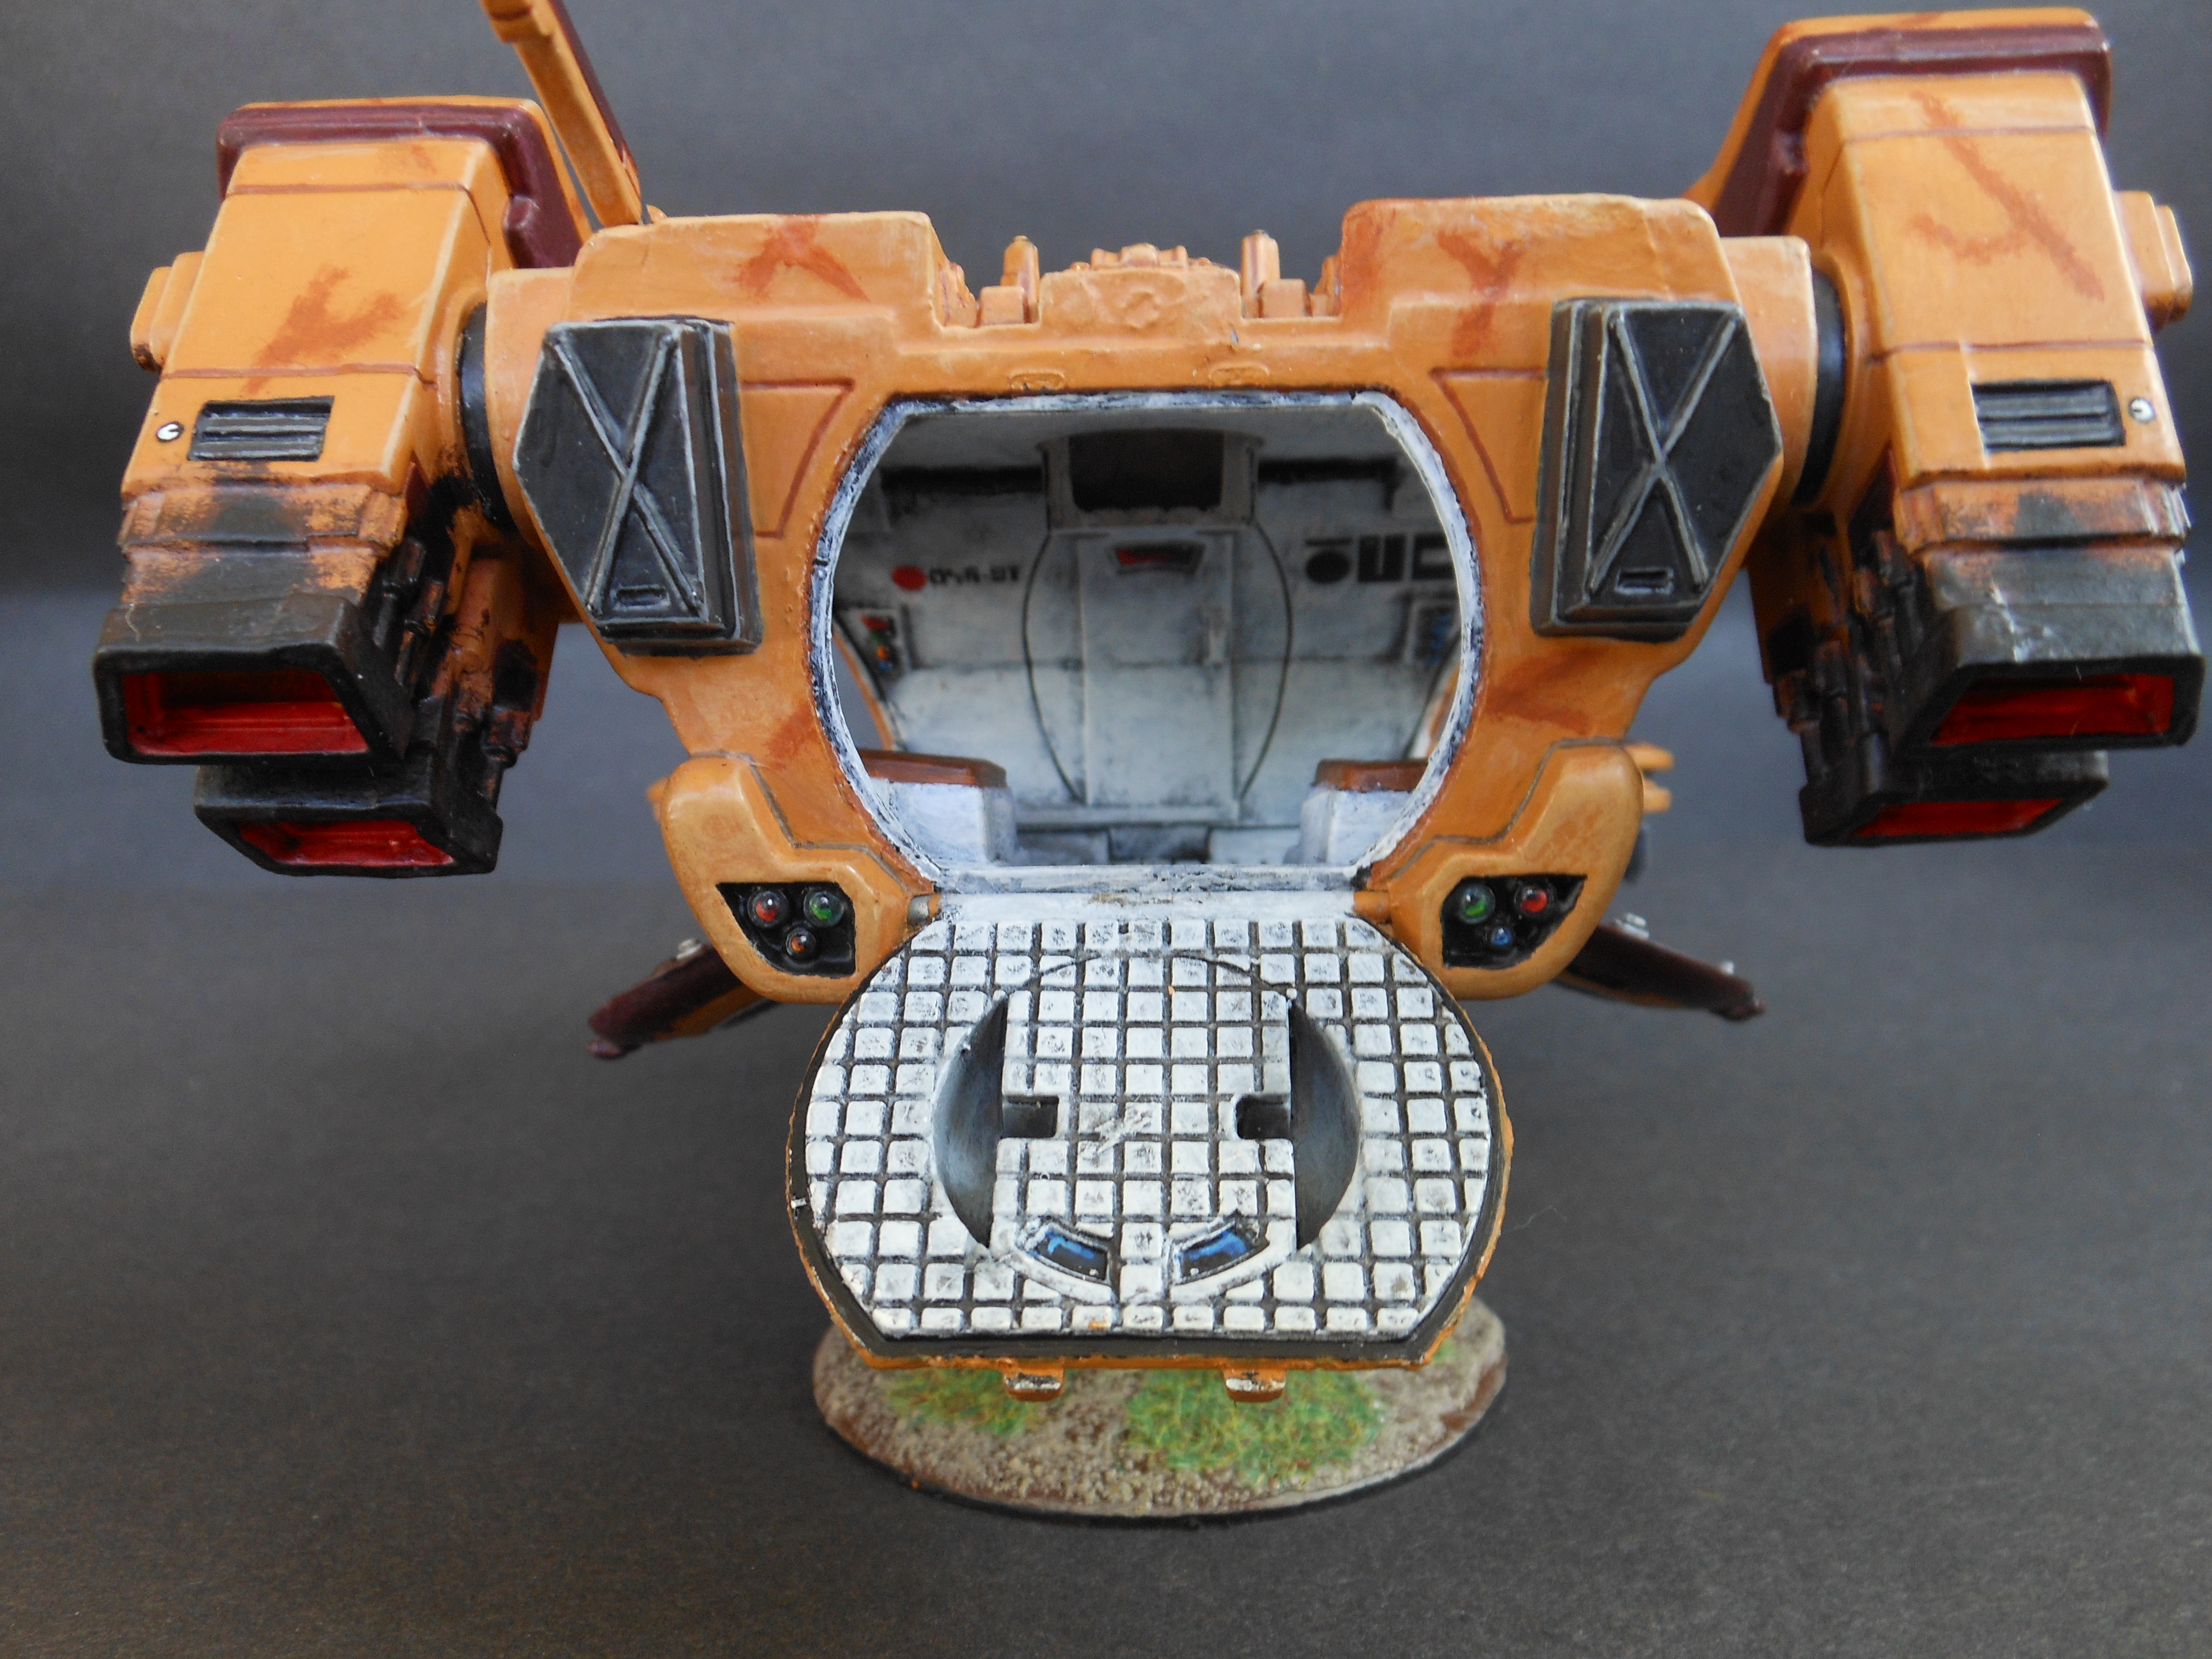
The doors in turn open to a completely refurbished interior.
The interior itself is mostly the same configuration it was first painted in, just updated to my latest painting standards. The white areas were enhanced by using the same method I once used to improve my first ever Battlefleet Gothic spaceship, and involved something I have only ever used twice including here - ink washes. Like my first Explorer class starship, I applied a liberal wash of very watered down black paint to the whole of the passenger compartment, then went back over it with a drybrush of white. This also conveniently repaired the warping on the areas contaminated with Simple Green.
From there it was mostly a matter of touching up the buttons with jeweled versions of their original colours - which was not the easiest thing to do as I had to work around several sections of hull that had already been glued in place - as well as the vision blocks, which were painted to reflect the environment beyond them, in other words the inner sides of the vision blocks were painted blue to reflect the sky outside and the outer sides were painted red, marking a return to the red vision blocks used in the GW Studio army which I am happy to settle for, and is a reflection of the red combat lighting inside the Devilfish itself. Speaking of, several casting pits and divots in the ceiling of the passenger compartment were painted up as dome lights, coloured red because they've been switched over to combat lighting.
The upholstery on the seats was also enhanced with a drybrush of Skraag Brown over Doombull Brown for some extra hard-wearing, stylish and comfortable leather padding - though naturally synthetic this time to avoid needless animal cruelty.
The interior has also at last been equipped with some stowage, this time not one, not two, but three pulse guns for a complete full gun rack. Moving forward all future transports in the army will be required by regulation to have at least one fully stocked gun rack on board at all times, because I am smart enough not to make any of The Classic Three Mistakes. This also means I will be deploying units as large as possible and avoiding any suspiciously well-paying bounty contracts for a maverick lone-wolf space outlaw with surgically-enhanced night vision. Even if issued by a planet facing imminent invasion from Newcrons.
Not that the Tau Fire Caste is generally given to the business of bounty hunting in the first place anyway.
The combination of two pulse rifles and a pulse carbine also indicates this Devilfish as being assigned to transport one of my tactical Fire Warrior teams.
The new Devilfish also features for the first time a complete set of markings, faithfully applied precisely according to the guide in Codex: Tau and painstakingly copied from the GW studio models using photos from Codex: Tau and White Dwarf #262(US) as reference. Since many of the marking icons used did not exist on the GW Tau decal sheet I had to create my own decals using an inkjet printer. These ultimately proved ineffective on their own, as Microsoft Word's crude graphics editor could not scale down the Tau letters and graphics to a small enough size, and the final printed decals lacked pigment. Instead I ended up printing off a set of circular markings in the right size and using them as templates to freehand over with the desired graphics. The results are a little wonky, but honestly so are the freehand letters on the GW studio examples.
The crew's personal roundel was chosen to be the same design used on the main GW studio Devilfish, visible in the painting example on the back of the box and Codex: Tau as well as the battle photo on the back cover of the codex. The slogan next to the cockpit was taken from the GW Tau decal sheet and reads "Y'eldi Shi" meaning "Winged Victory" which seemed fitting enough. There were also plans for a second slogan around the edge of one of the side doors, but the curved slogans on the decal sheet proved unable to fit there.
Similarly after the number Lobba barrages my Fire Warriors have been subjected to I had also planned to freehand "PIN US NOW ASSHOLES!" in actual Tau'sia onto one of the side doors, but even after all my time spent painting tiny Elven runes onto banners my freehanding skills were not able to produce acceptably good looking painted letters to the right size.
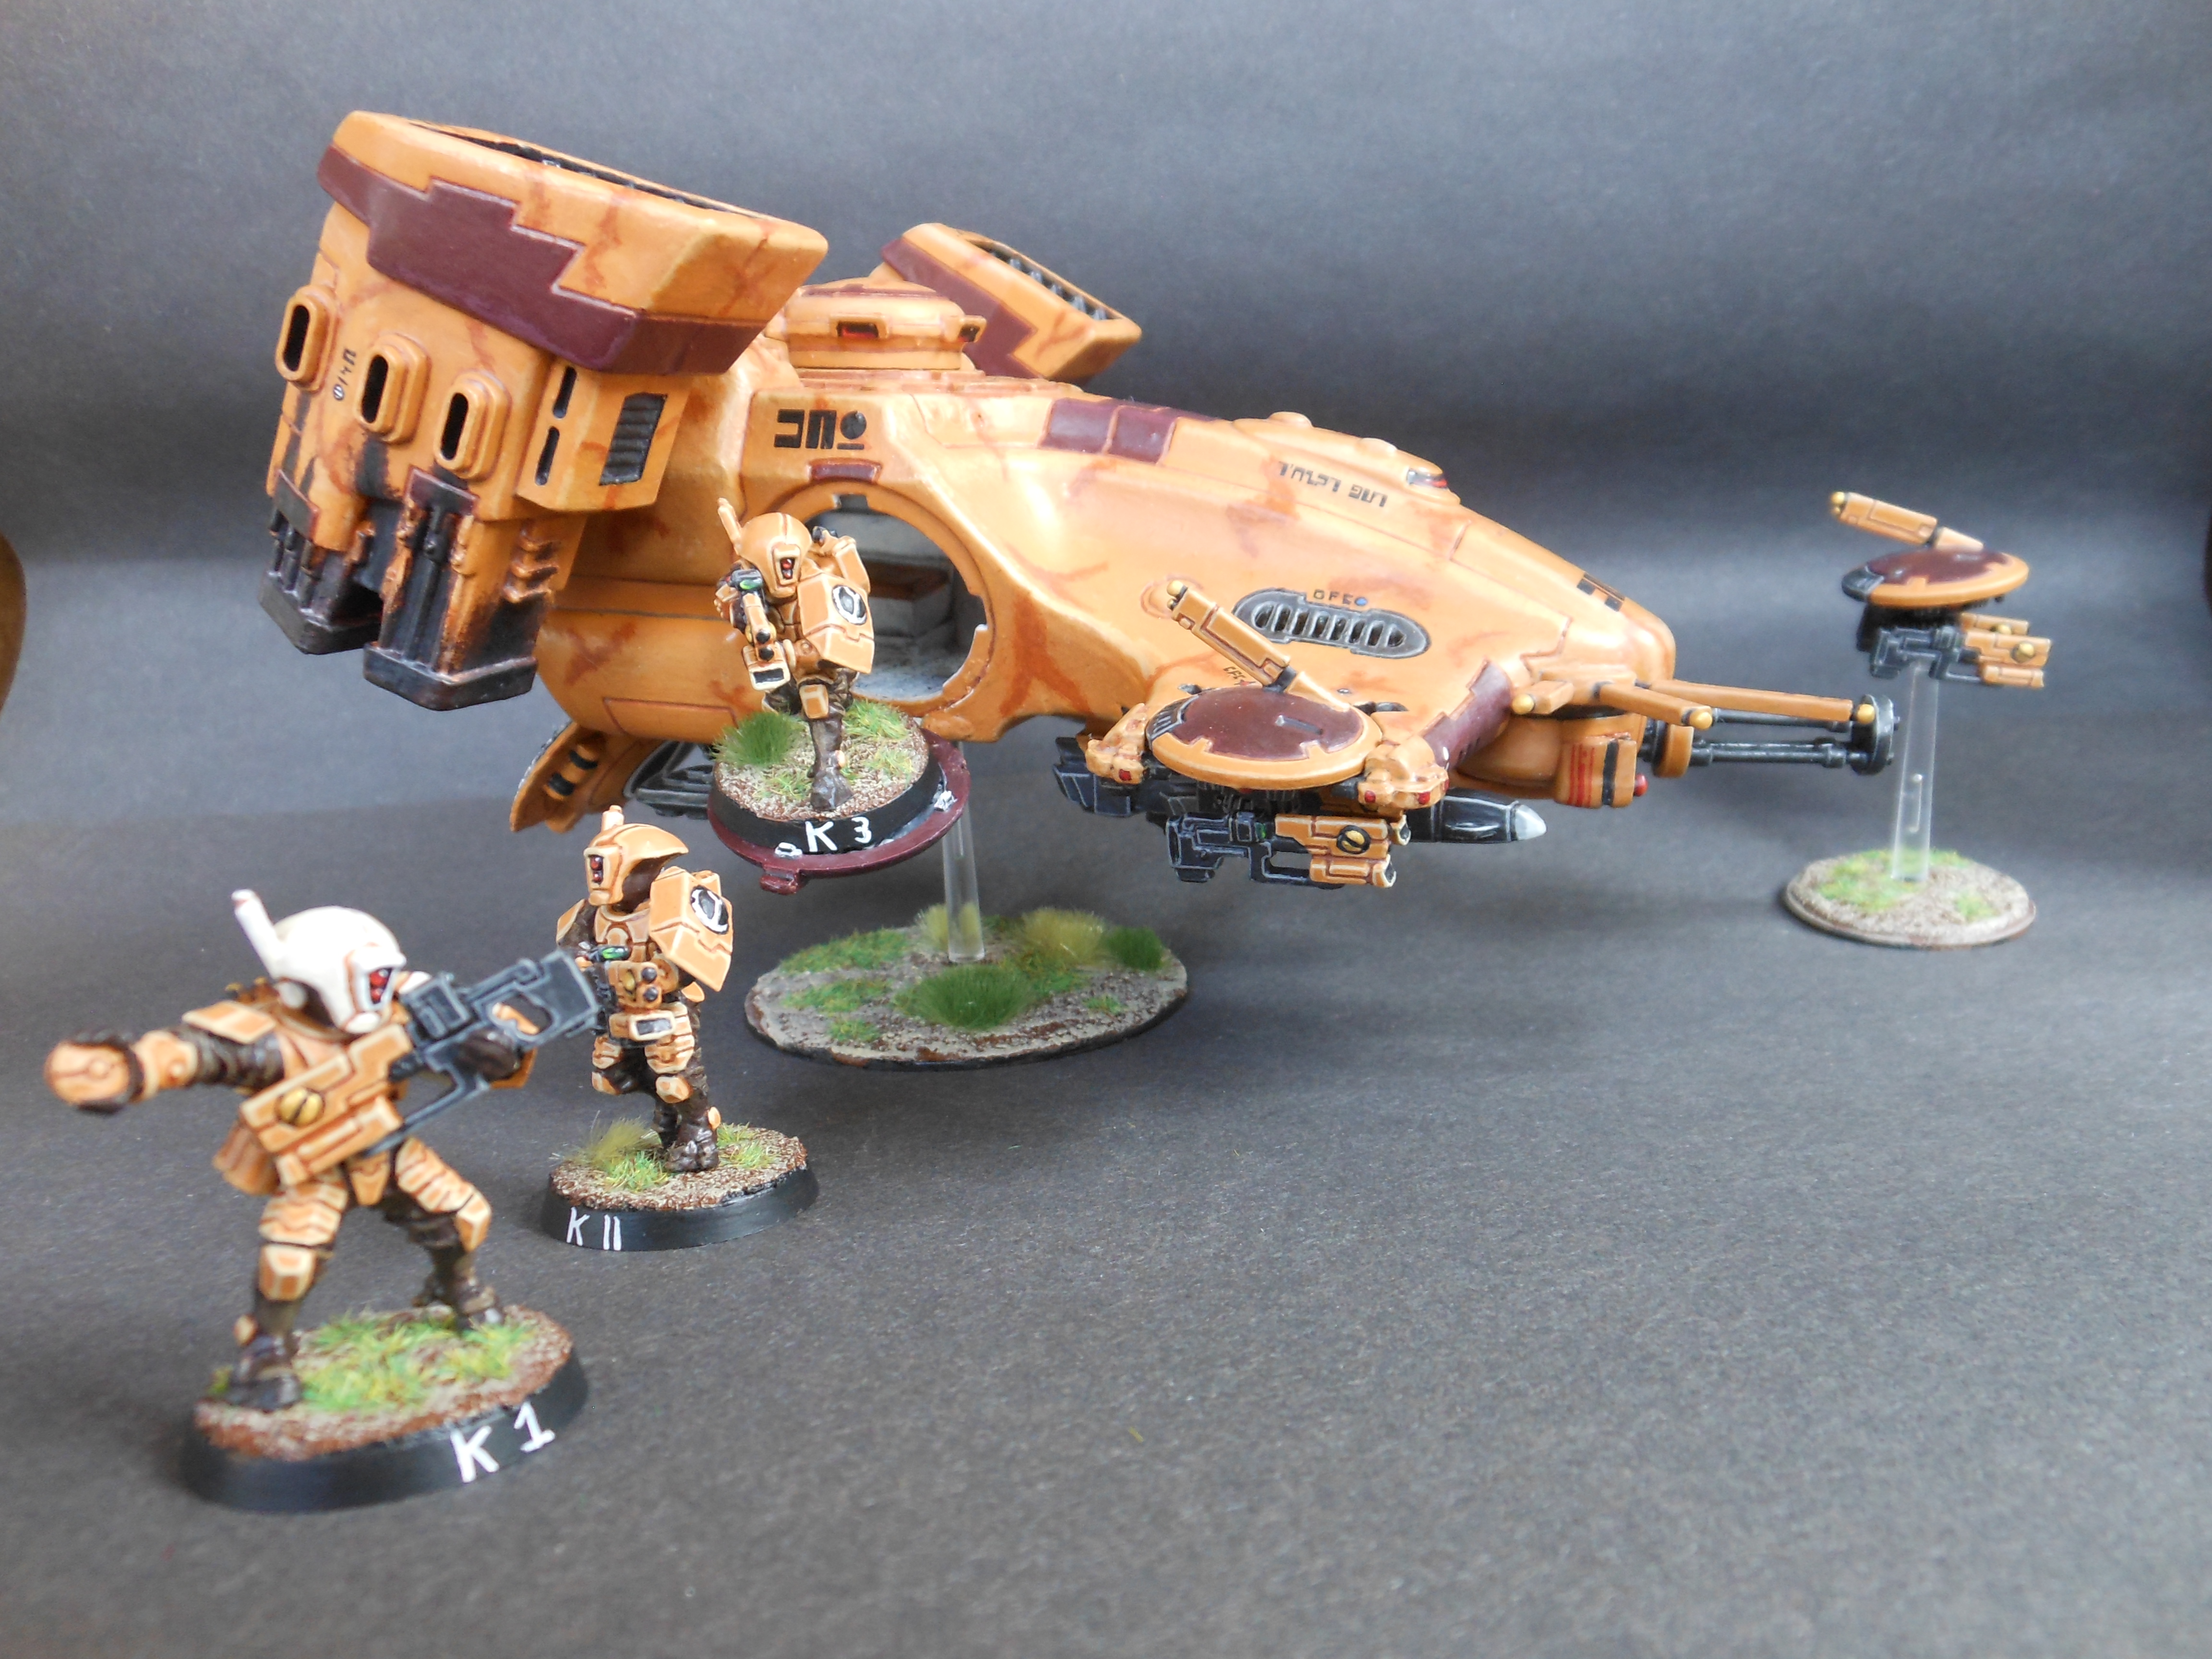
The new Devilfish,
Arrow 1, has already seen action and performed well in her tabletop debut. It is expected that she will see much more use this year.
In the meantime, I now have a modest army featuring a solid core of infantry, jump infantry, assault weapons, and now heavy weapons and vehicle support. It is time, at long last, to close out the beginning of my rebooted Tau army with the most awe-inspiring beautiful centrepiece model GW ever made in plastic...


I genuinely respect the holding on to original models. Your progress as a painter is nowhere more apparent than "same model, three times" – I'd show this post to nervous starter painters all "you'll get there" stylee.
ReplyDeleteLingering paint stripper... hoo. One of the Chaos Lords I recently parted with never stopped smelling faintly of Biostrip. (It's a curiously penetrating soapy smell, like hospitals.)
Shame about the crusting on the new 'fish, as it's a very fine model in other respects. The War on Blue Light is highly commendable (pay no attention to what's going on with my Tesla coils...) and that burning orange engine certainly aligns with your classic jethead ideal.
And always remember: you keep what you kill...
Chalk it up to a combination of placing enormous value on my own history and adopting the same approach to procurement as the Soviet Army. Never throw anything away, it's still useful in rear echelon security and civil defence, you never know when a heavily armed warband of psychopathic space marauders might suddenly appear on your doorstep looking for trouble...
Delete(and also when your entire model procurement comes from two medium-big boxes each year and maybe a couple of smaller ones if you're lucky, it endears an attitude that Every Last Model Counts)
Apocalypse also did a lot to help vindicate holding onto them with its photo example about how even early paint jobs can join in, and that book really is a much bigger influence on me than it's often given credit for. Whatever stratagem sins it may harbour, it did do good in challenging the 1500 point Tournament Prude hegemony and making a clear bold official stamp statement that it's OK to just empty your figure collection on the table and have fun (however capitalistic its intentions may have been).
Crusting aside I am very happy with how it turned out, and based on the latest hull inspections it seems like even the crusting is unlikely to be too much more of a nuisance than the outbreaks of Base Rot that happen among my infantry models from time to time.